Feature Purpose:
Provides the organiser with a list of all added halls so each can more easily be managed
Working with this Feature:
In the Floor Plan Editor, when the user adds more than one hall and a General Plan image is added, a list of halls appears on the right side of the screen.
This list displays all the halls that have been added to the General Plan.
Users can edit each hall or add a new hall by clicking on the Add a New Hall button.
The shapes of all added halls are visible on the General Plan image.
Add a Hall
In the Admin panel - Management - Floor Plan - there two ways to add a Hall
With General plan
After adding a General plan image user can click on the Add a new Hall button
then set the Hall on the General plan image and then click on the Save button
on the next screen user should add a Hall image, set the Hall name and settings and Save all changes
after saving the New Hall will be present on the General plan
One Hall
After picking “I have only one Hall” user has the ability to add and set an image of the new Hall
after confirming on the next screen user should set the Hall name and settings and Save all changes
after saving the New Hall will be present on the Floor plan editor page
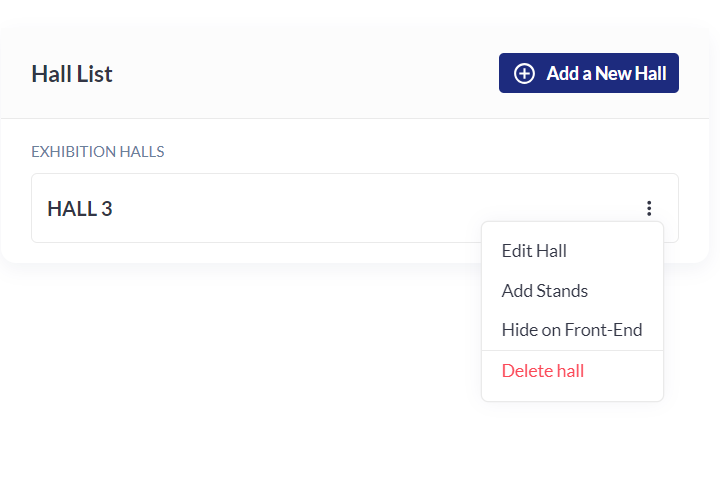
Edit a Hall
User has the ability to Edit any Hall which was previously added by clicking on the Edit Hall button under the three dots buttons in front of the certain Hall
In the editing Hall window user can :
-
set Hall name
-
mark Hall as a Conference Hall and/or Check-in zone
-
Hide Hall on Front-End
-
set the working dates
-
set the working hours
-
apply picked dates and time to whole event
-
apply picked dates and time to current month
-
pick dates and time as a closed
-
save all changes or cancel them
Location needs to be marked as conference hall AND check in zone in order to run sessions for speed netwoking.
Delete a Hall
In the Admin panel - Management - Floor Plan - there two ways to delete a Hall
-
To delete Hall with General plan image user should click on the three dots near the certain Hall and then pick Delete hall and then confirm the chooise in the pop-up window
-
To delete Hall without General plan image user should click on the three dots near the certain Hall and then pick Delete hall and then confirm the choice in the pop-up window
Sorting and Bulk Delete for Halls and Stands
As of 3 June 2026, the floor plan backend (Admin Panel → Management → Floor Plan) supports natural alphanumeric sorting, multi-select, and bulk delete for both hall lists and stand lists.
Sorting:
-
Hall and stand lists are now displayed in natural alphanumeric order (e.g. Hall 1, Hall 2, Hall 10 — not Hall 1, Hall 10, Hall 2).
-
This applies across all events using the Floor Plan backend.
Multi-select and bulk delete:
-
Navigate to Admin Panel → Management → Floor Plan.
-
In the hall list (or stand list within a hall), select one or more halls/stands using the checkbox next to each item.
-
To select all items, use the Select All checkbox at the top of the list.
-
Once one or more items are selected, a Delete (bulk delete) action becomes available.
-
Confirm the deletion in the pop-up window. All selected halls/stands are deleted in one action.
Why this matters for large events: For events with many halls (e.g. 27+ halls), organizers can now sort, find, and bulk-delete halls without individually managing each one. The previous workflow required clicking the three-dot menu on each hall individually.
Hide a Hall
After adding Hall on the Floor plan user has the ability to Hide the Hall on the Frontend.
First way to Hide
To Hide the Hall user should click on the three dots near certain Hall and click on the Hide on Front-End button
After hiding a new icon will be present near the certain Hall
Second way to Hide
In the Hall Editing process user can tick the box Hide on Front-End and save the changes
Once a hall is hidden, the hall will not be displayed on the frontend and will disappear from all floor plan services such as Wayfinding and hall search results. For users, the hall will not be visible in any case.
Once the Hall is created you can add stands
-
by marking the floorplan manually