Overview
To import sessions into ExpoPlatform, you'll need to use an Excel file that matches specific required fields. This template can be downloaded from the Import page.
Here's a guide to the process:
-
Accessing the Import Feature: Navigate to the Admin Panel, then go to Data → Import/Export → Import. You can download an example file from here to get started.
-
Filling Out the File: The Excel file includes
Mandatory Fields: Ensure the following fields are filled, carefully following the format provided in the example for each field, and ensuring that all required details for your event are filled out:
Title: The session's name.
Track: Session category or topic.
Type: The format (e.g., online, hybrid).
Language: The session's language.
Date: Scheduled date of the session
Optional and Additional Fields
Several fields can be customized to add more detail:
Session Description: Brief summary of the session’s content.
Session Location: Specify the event’s location (physical or virtual).
Session Tags: Add relevant tags for easier categorization and search.
Product Categories: Relevant for trade shows or themed sessions.
Session Logo/Colors: You can upload a logo and customize colors for a unique look
Managing Paid Sessions
For paid sessions, additional fields are:
Session Price: Set the price without VAT.
Max Ticket Quantity: Define how many tickets are available. These fields ensure users can add sessions to their basket and purchase them until tickets run out.
External Registration URL: Use if aessions must be purchased outside of ExpoPlatform.
-
Uploading the File: Once the file is complete, return to the Admin Panel and upload it through the import function.
Important Details
Tracks, Types, Subject Tags and Filters are also the part of the import process.

The columns marked “yes” or “no” means the functionality is on or off, respectively.
Some columns contain a number, such as Child Exhibitor ID, Contact Person ID, Product categories, Moderator’s ID or Speaker’s ID is their Participant ID. You can get these IDs from the respective export file.

The organiser can import Speakers/Moderators to the Session/Exhibitor Event by using the external ID attached to the speaker/moderator using the Session Import file or API or other third-party integration
If there are multiple speakers passed via API it should be separated by double pipes.
If there are multiple speakers imported via import, they should be separated by comma(,)
You can add embed codes or scripts inside their respective tags.
It is possible to rewrite/update part of the information for the session, just fill in the column where information needs to be changed and leave other columns blank.
Remember to indicate Session ID as obligatory, otherwise, a new session will be created.
Upload Exhibitor Events using Session Import File
Important Note: If you’re uploading Exhibitor Event information, please make sure to fill in the "Exhibitor ID" field. If this field is left blank, the session will be treated as a Regular Session instead of an Exhibitor Event.
Organizers can also upload Exhibitor Events from Admin Panel → Data → Import/Export on behalf of the exhibitor.
-
While uploading the exhibitor event, the organizer can map the exhibitor team member as the Contact Person by adding their participant ID which can be collected from the Visitor Export file from Admin Panel→ Data →Import/export → Export
-
If any exhibitor has a child exhibitor added then this detail could also be imported by using the child exhibitor ID column and this data can be collected from the Exhibitor Export file from Admin Panel → Data →Import/Export → Export
-
Other columns can be polluted like any other session on the event
-
Exhibitor ID is mandatory to map it as an exhibitor event
-
While importing the Exhibitor Events organizer can specify custom locations(Other) in the session location field

Exhibitor Events added by bulk import will always be uploaded with the approved status
Important Note: When uploading Exhibitor Event information, please make sure to fill in the "Exhibitor ID" field. If this field is left blank, the session will then be treated as a Regular Session instead of an Exhibitor Event.
Mulitlingual Sessions
To Import Sessions in Multiple Languages, please follow these important steps:
-
Ensure your import file includes separate columns for each language variant of the session title. For example, if your event supports English, French, and German, your file should have columns like "Title eng," "Title fr," and "Title de."
-
Ensure your import file includes separate columns for each language variant of the session description. For example, “Desc eng”, “Desc fr”, “Desc de” and “Desc eng”
-
When importing your file be sure to map the correct language columns i the spreadsheet to the correct field where that language column should be used as shown below.
After confirming that you want to upload your session import file, you’ll see the field mapping pop-up. For each non-English session name field, for the languages you’re using in your event, you’ll need to click the arrow on the right and choose the name of the field in your import file where this non-English name will be found.
This mapping process should be repeated for each non-English name field and each non-English session description field applicable to your event.
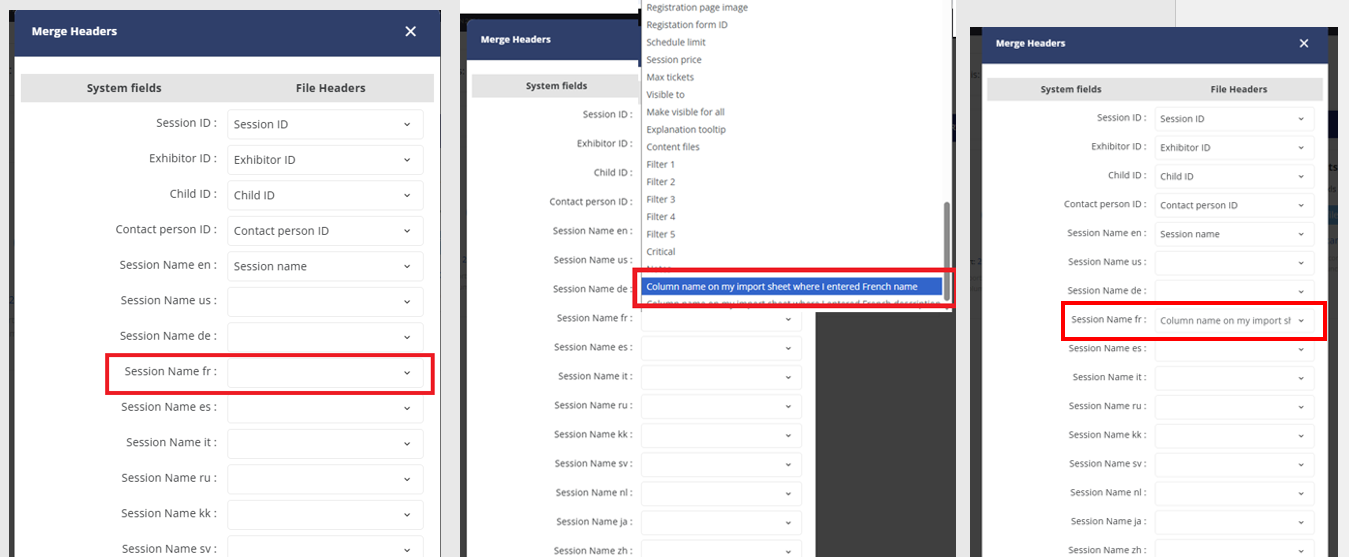
Step2: In the dropdown list, locate the name of the relevant column that you added to your import sheet
Step 3: Select that column name and confirm that the mapping field is populated
Repeat for each non-English session name field and each non-English session description field