
Feature Purpose:
The Multilanguage Feature in our web builder allows users to manage and customize content across multiple language versions seamlessly.
Working with this Feature:
Steps to enable Multi-Language for the event
Step 1: Organisers can seek the help of the TAM to get the required language enabled for the event
Step 2: Now navigate to Website Builder → Select the Language in which you want to create your website
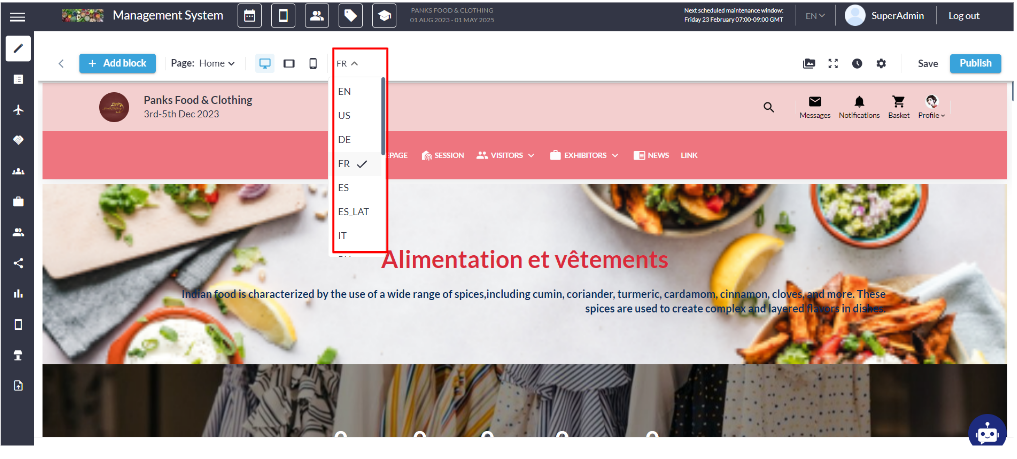
Step 3: Start creating the content in that language → Click on the Save button from the top right of the screen →
Step 4: Click Publish to push the changes to the website frontend.
Multi-Language: Synced and Desynced Version
By default, all blocks are synchronized across all language versions, meaning any changes made to a block are reflected in all versions. However, the organiser can choose to desynchronize the website for different language versions.
On the Desynced website, each block functions independently, allowing for unique designs in each version. Blocks on pages in various languages can be added, removed, or edited without affecting other language versions.
How to Desync the Website
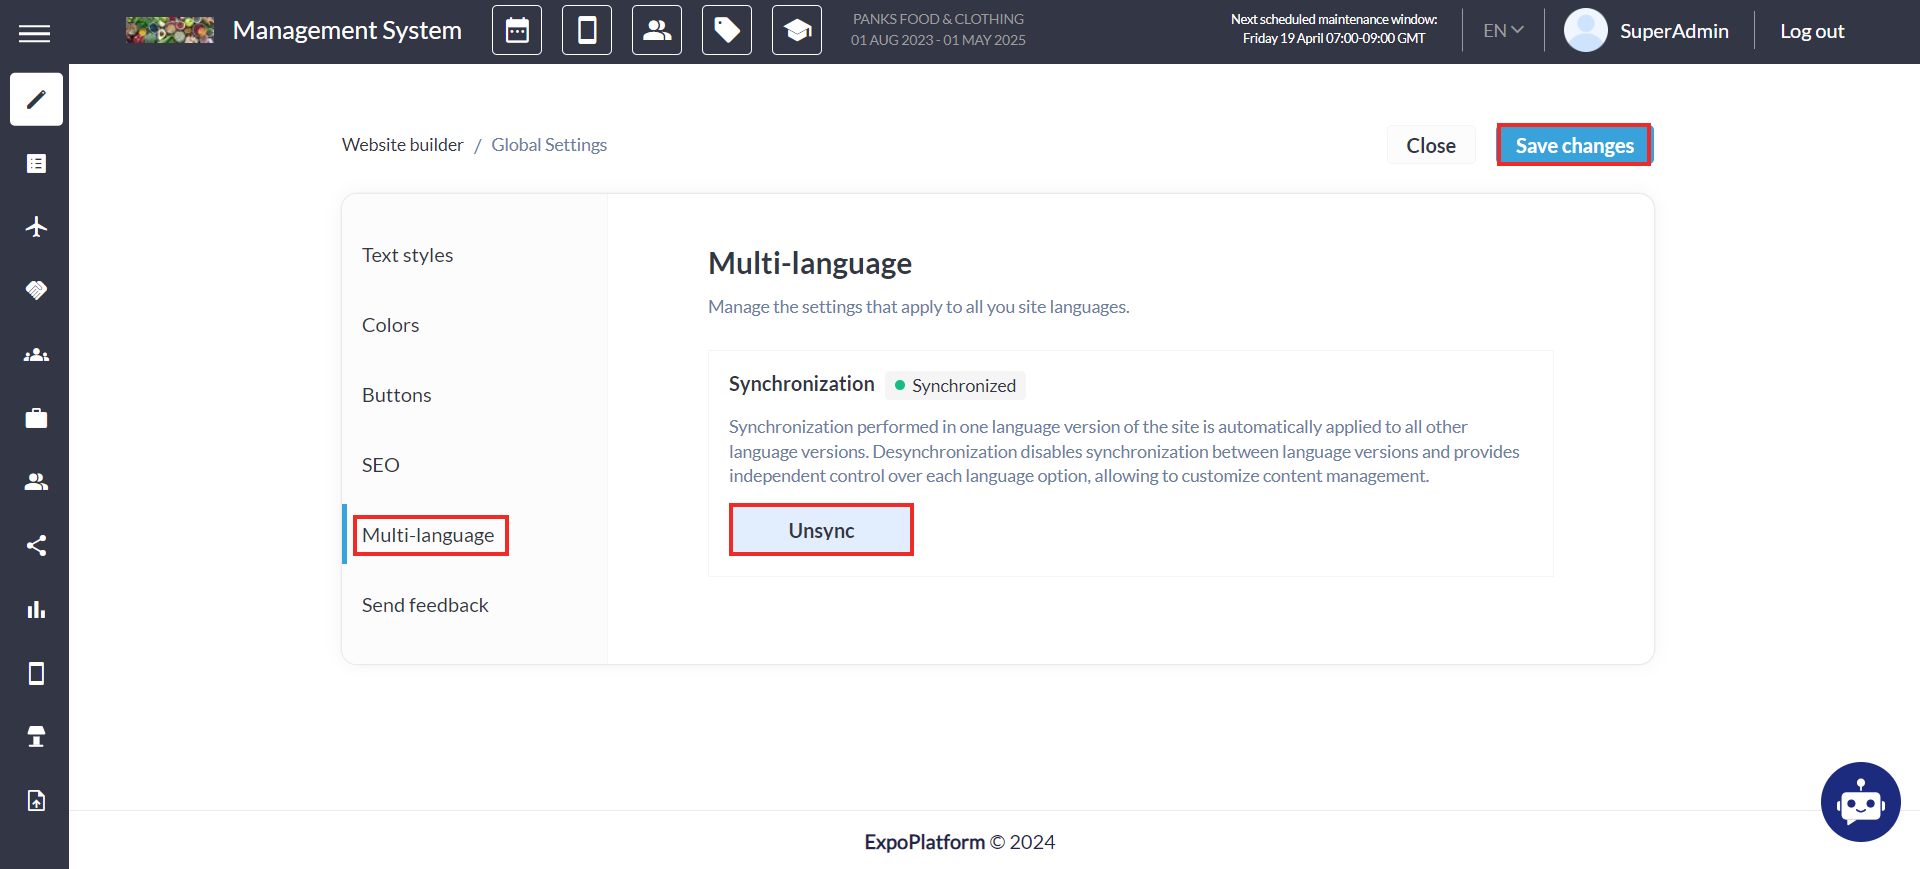
Step 1: Navigate to Global Settings
Step 2: Select Multi-Language → Click on Unsync System would ask for confirmation if you want to Unsync the website → Click Confirm → Save Changes from the top right
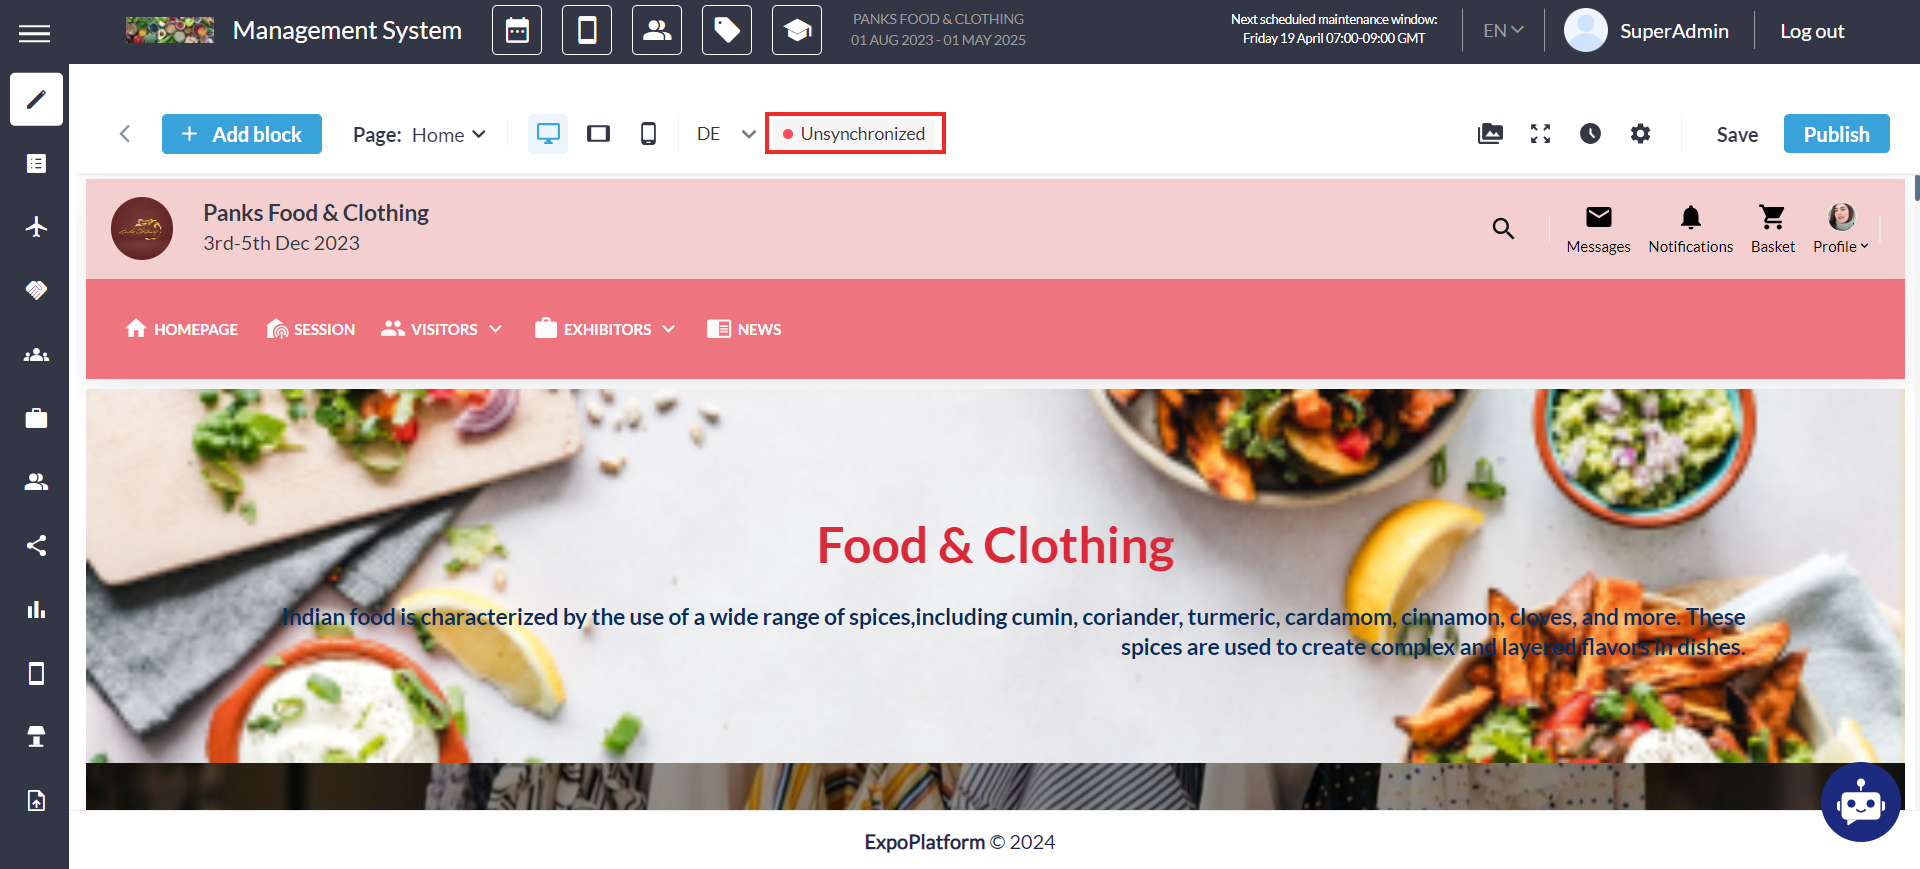
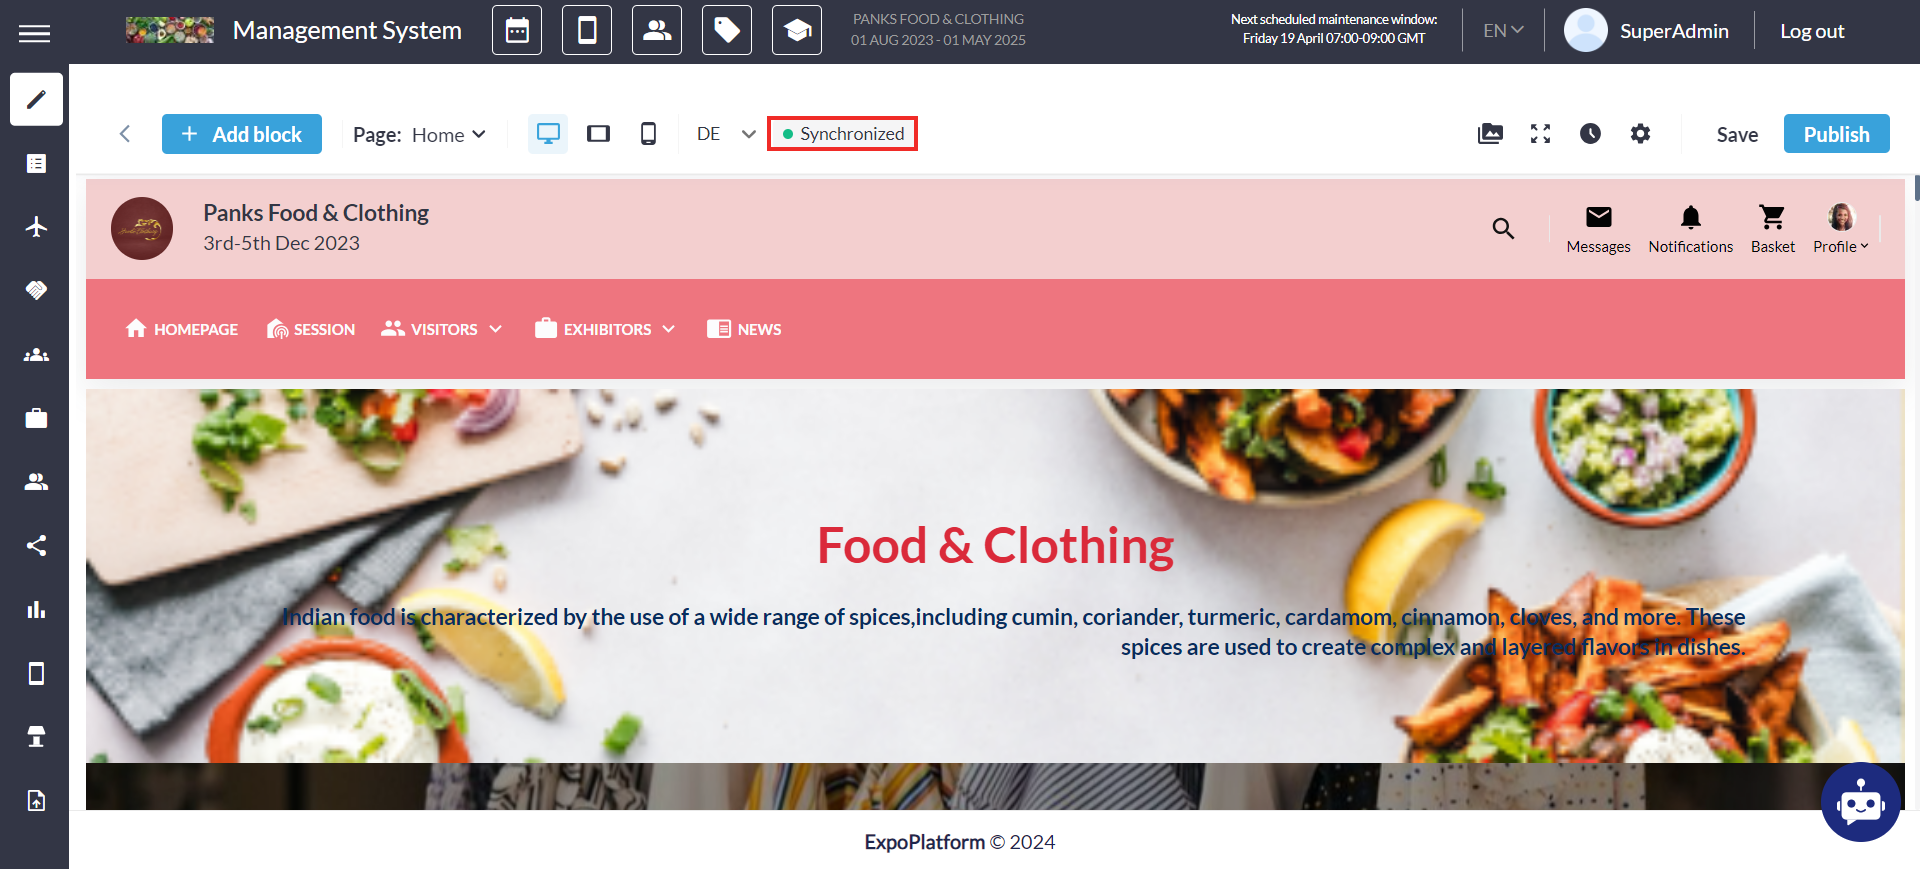
Step 3: An indication is displayed at the top of the web builder page, notifying users that language versions are desynchronized.
PleaseIf the organiser wants, they can reset the Desync option to the synchronised website where all the blocks will again be synced in all language versions of the website.
How to Reset the Synced Website
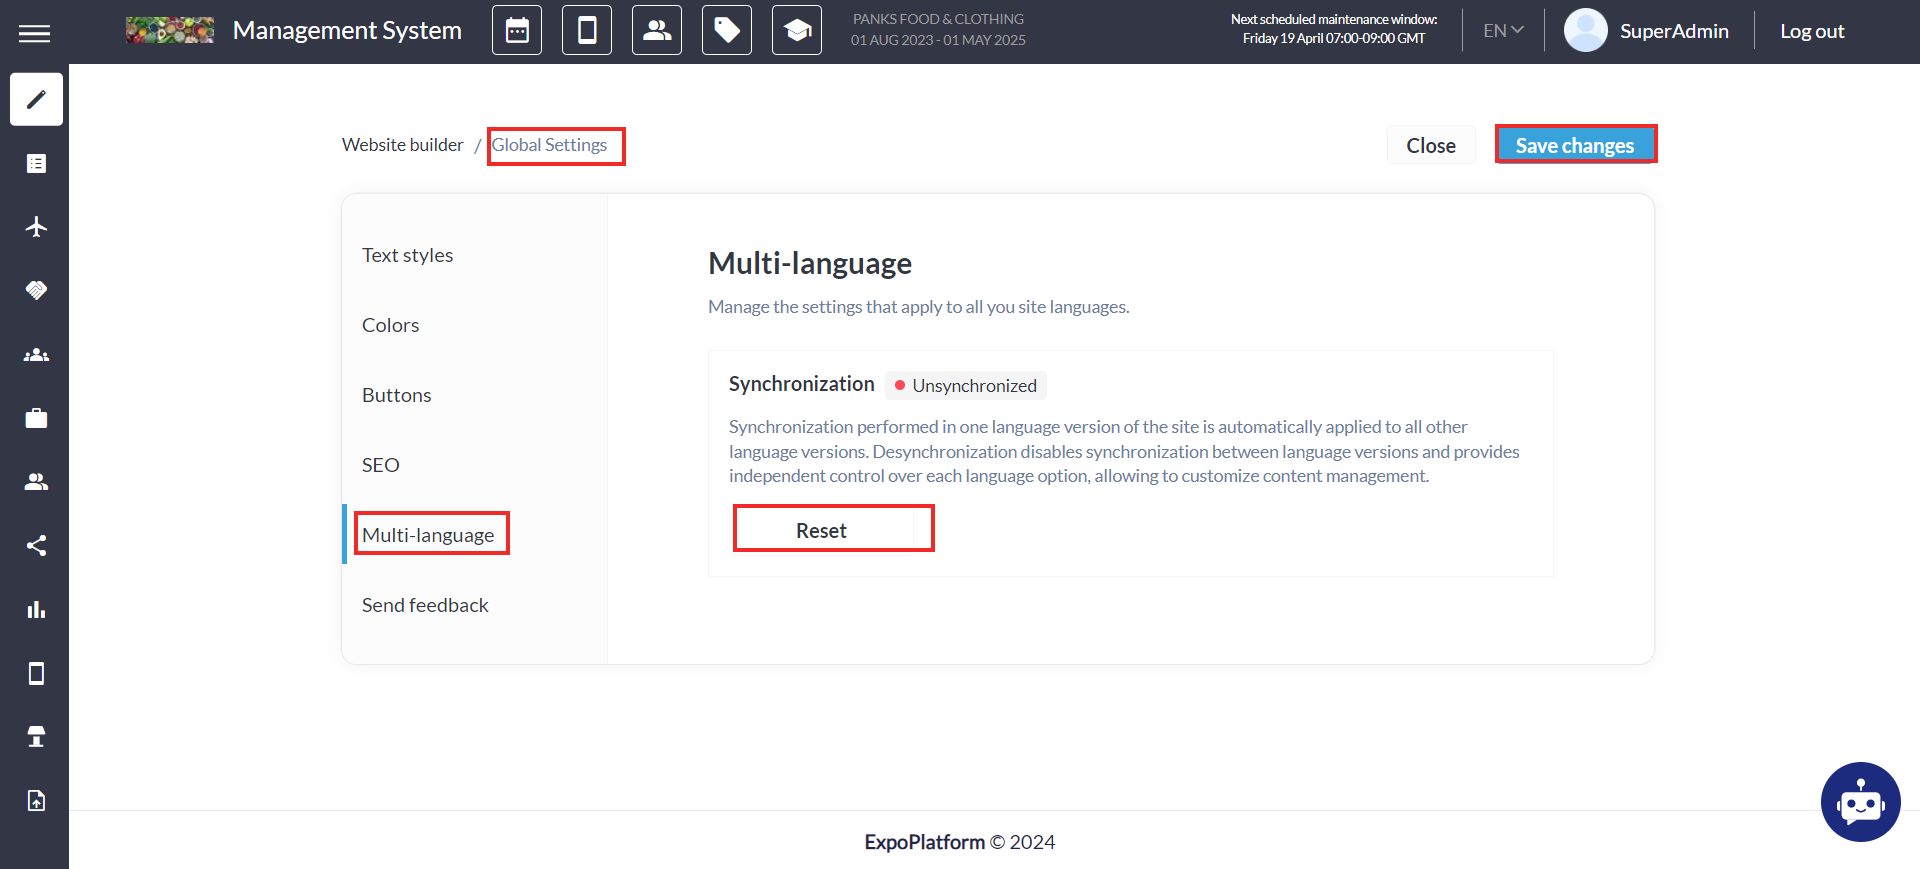
Step 1: Navigate to Global Settings
Step 2: Select Multi-Language → Click on Reset and the system will ask for confirmation that you want to Reset the Synced Version for the website → Click Confirm → Save Changes from the top right
Step 3: An indication is displayed at the top of the web builder page, notifying organiser that language versions are synced.
Step 4: The Organiser can also reset to the synced version by restoring the Synced version under Site History
Multi-Lingual Content
Multi-lingual content is related to multi-language interfaces in that the language selector for the event described in the previous section, also regulates the languages that are available for content. For example, if English and Japanese are selected as the two languages, with English as default, then it will be possible to populate content (in admin panel and for end-users) in English and in Japanese respectively.
The following items should have descriptions in multiple languages (for admin and end users):
-
Product categories (admin)
-
Exhibitor descriptions (admin/end-user)
-
Product descriptions (admin/end-user)
-
Product names (admin/end-user)
-
About me for people (admin/end-user)
-
Speaker/Moderator bios (admin/end-user)
-
News (admin/end-user)
-
Session descriptions (admin)
-
Session titles (admin)
-
Website content block text (admin)
-
Website menu items (admin)
-
Registration form fields and response options (admin)
During set-up for each of the above, interfaces that handle this logic must be created for admin and for end-user (if applicable).
Translating your website pages manually using the language switch
Who this is for: Organisers whose pages have already been designed in the primary language (e.g. English) and who now want a second language (e.g. French) with the text translated by hand rather than auto-translated.
Before you start: The extra language must already be enabled for your event — ask your TAM if you don't yet see the language dropdown at the top of the builder.
Step 1: Open the Website Builder → Event Setup → Build Website → choose your website.
Step 2: Find the language dropdown at the top of the builder toolbar. It shows the current language — e.g. EN — with a dropdown arrow to switch. (In the builder toolbar it sits between the device-preview icons and the sync indicator.)
Step 3: Click the dropdown and switch to the second language (e.g. FR). The builder now shows the same pages in that language — same layout and blocks, ready for translated text.
Step 4: Edit each block's text and translate it in place. Click into a text block and replace the copy with the translation. Layout, images, and styling stay exactly as designed — you are only changing the words. Work through every page.
Step 5: Repeat for menu items, buttons, and any other block text so nothing is left in the original language.
Step 6: Click Save and Publish (top right of the toolbar). This single action saves and pushes all language versions live together.
Step 7: Switch the dropdown back to the primary language to confirm the original is unchanged.
Good to know:
-
Only text needs translating — you don't rebuild the pages; the design carries across every language version.
-
"Unsynchronized" indicator: if the toolbar shows "Unsynchronized", the language versions have been desynced so each can differ block-by-block (fine for hand-translating text). If you need layouts kept identical across languages, or want to change the sync setting, desync/resync from Global Settings → Multi-Language — see the Synced/Desynced section above.
-
Content held outside the builder (exhibitor/product descriptions, session titles, registration form fields, etc.) is translated in its own admin section, not here — see the Multi-Lingual Content list above.
Favourite Block
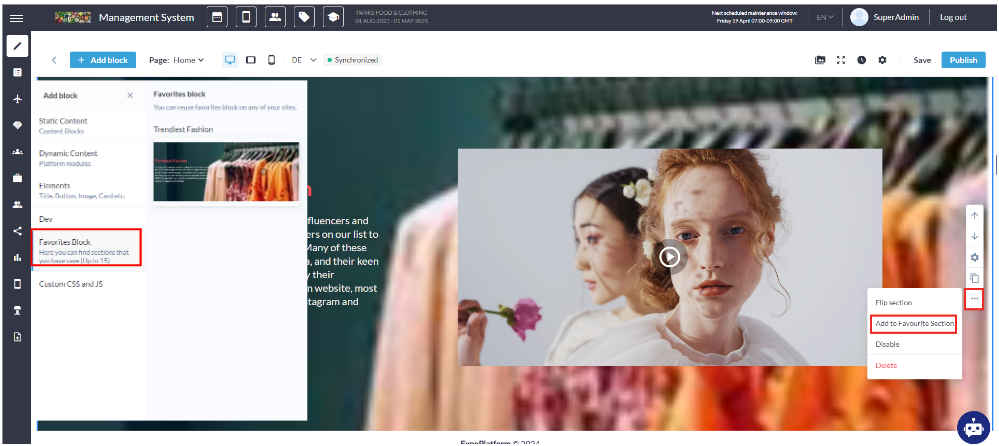
The website builder also allows the organiser to set any block as a favourite block. This action saves the block in its current state under the "Favourite Blocks" section in the left-side menu. Favourited blocks retain their exact state when added to the Favourites section. This includes all content, styling, and configurations, ensuring consistency when reused.
Favourite blocks are accessible across all language versions of the website. This promotes efficient content reuse and consistency in design elements. Organisers can freely add Favourite blocks to any page or language version and subsequently edit them.
Steps to add any block as a Favourite Block
Step 1: Click on the block → Click on 3 dots under the navigation menu of the Block
Step 2: Add to Favourite Section
Step 3: Organiser can name the Block → Click on Save
Step 4: The block gets added in it exact state under the Favourite Block on the left panel under the Add Block option
Step 5: The organisers can freely add Favourite blocks to any page or language version and subsequently edit them.
Troubleshooting:
-
Please note that the Reset or Resync will remove all other language versions and synchronise them with the main language (English)
-
Also organisers can add up to 15 blocks as the Favourite Blocks
-
The following items should have descriptions in multiple languages (for admin and end users):
-
Product categories (admin)
-
Exhibitor descriptions (admin/end-user)
-
Product descriptions (admin/end-user)
-
Product names (admin/end-user)
-
About me for people (admin/end-user)
-
Speaker/Moderator bios (admin/end-user)
-
News (admin/end-user)
-
Session descriptions (admin)
-
Session titles (admin)
-
Website content block text (admin)
-
Website menu items (admin)
-
Registration form fields and response options (admin)
During set-up for each of the above, interfaces that handle this logic must be created for admins and front- end users (if applicable).