
Meeting Settings and Blocked Times
This article illustrates how organizers can oversee various settings related to meetings and their setup.
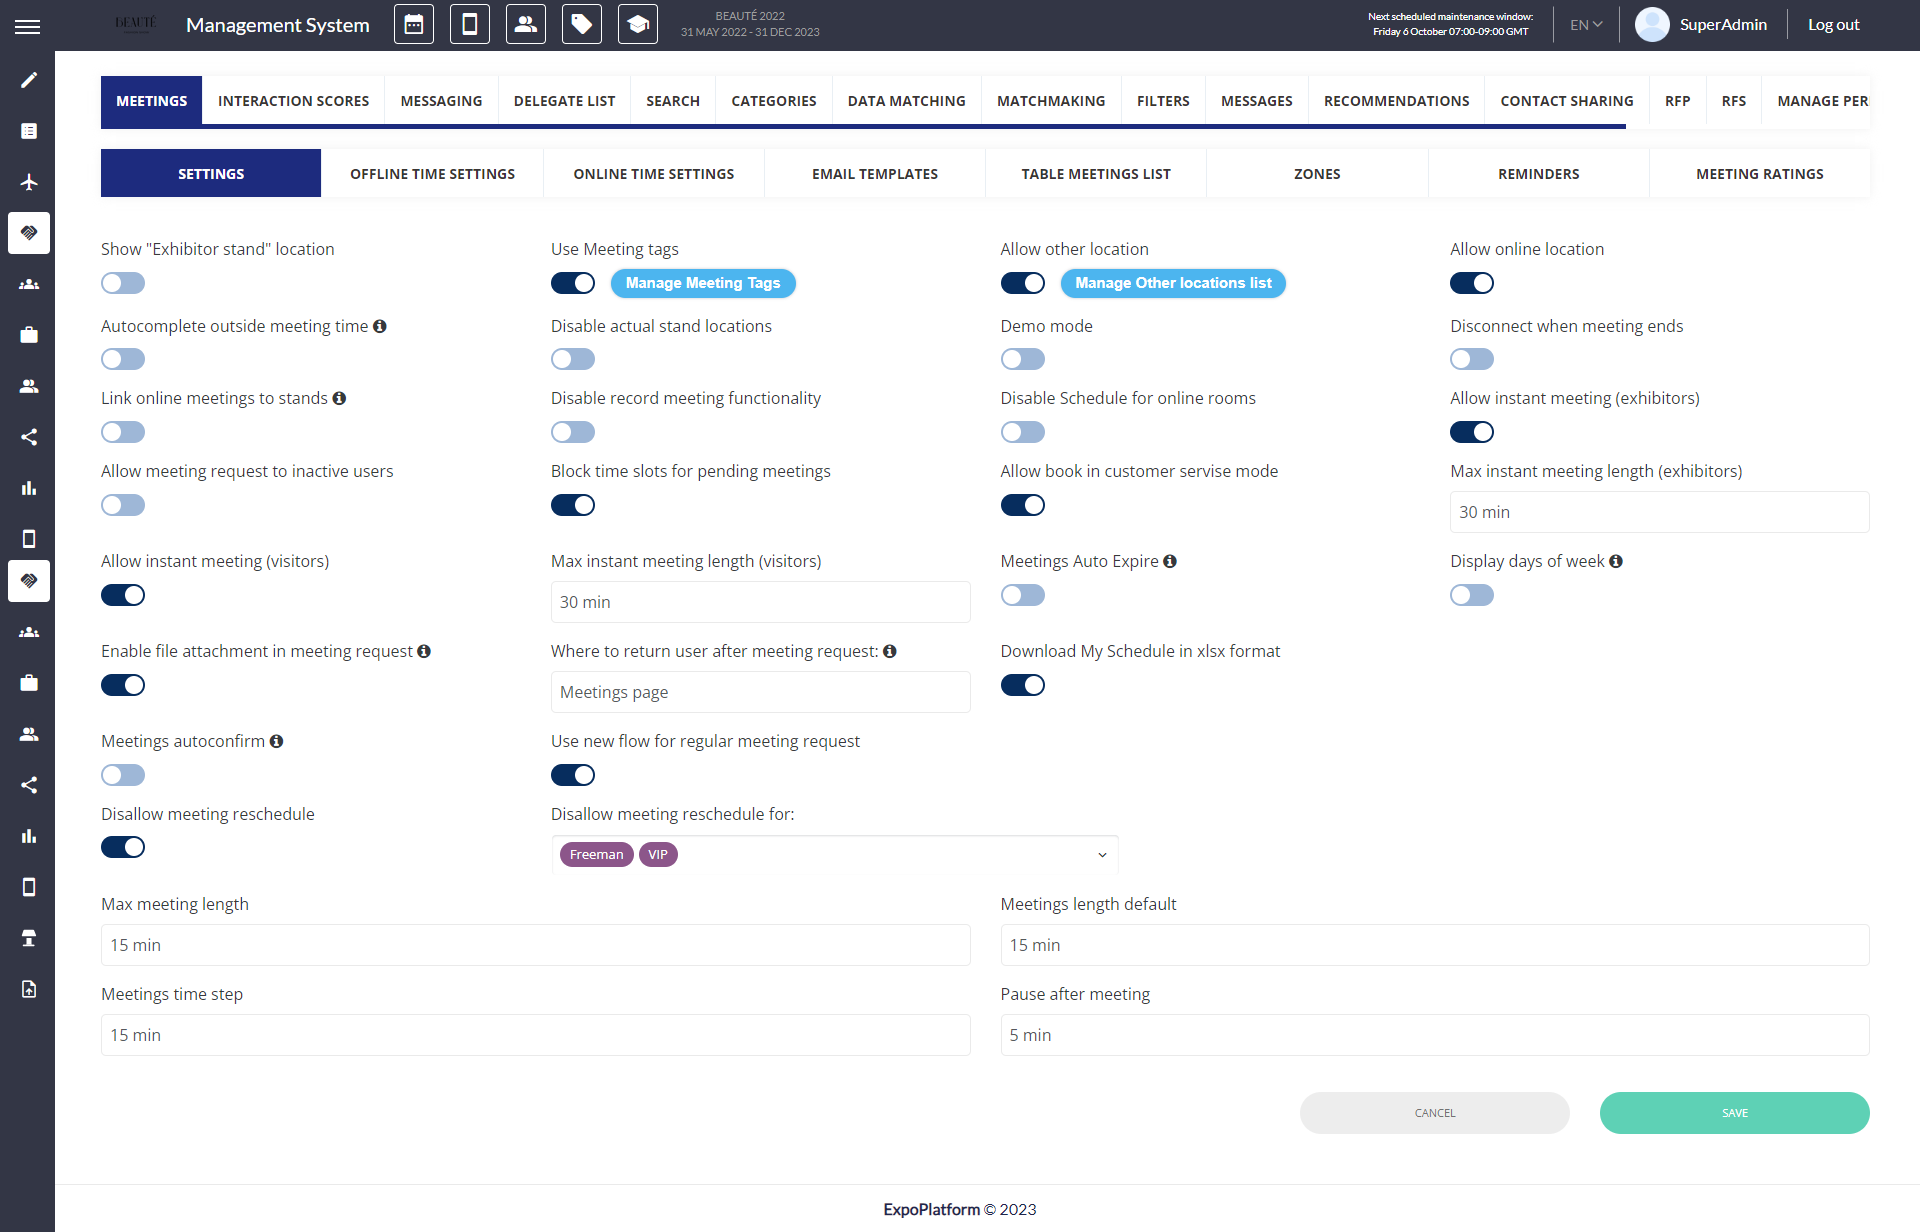
Meeting Settings
Settings-
It allows you to choose different locations where meetings can be conducted - Exhibitor stand, Online, or any other location. For example- For Online meetings, you can enable “Allow online location“ and “Disable actual stand locations“.
Show exhibitor stand location will allow users to select their own stand for the meeting
Autocomplete Outside Meeting Time If enabled all confirmed meetings will be marked as autocompleted when meeting participants scans badges
In case, where Exhibitor without team members was added to the meeting (and later team members were added for that Exhibitor but not assigned to the meeting).
Exhibitor being part of a meeting, and none of its team members are added to that meeting, then if ANY of his team members scans (or is scanned) by another participant of the meeting – meeting is marked as complete.
Admin panel setting: Enable toggle Autocomplete outside meeting time under Networking & Matchmaking → Meetings
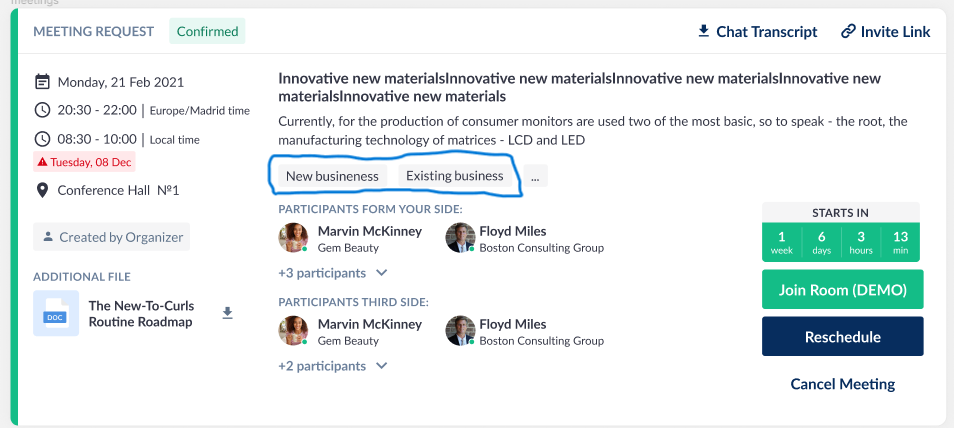
Use Meeting tags allows to add further details to the meeting request
Allow other location: You may create other (custom) locations at the venue to be selected as meeting location like Networking Lounge 1, Cafeteria, Table 1, Conference Room A, etc.This feature helps the organizer know the meeting location's details other than exhibitor stands.
Allow online location if online meeting have been made available for an event
Disable actual stand location
Demo mode can be turned on for testing the online meetings feature before the start of the event.
Disconnect after meeting ends: If this feature is turned on, the meeting room closes 10 minutes after the meeting time ends and all the participants will be automatically be removed from the meeting room.
Send rate notifications: Sends user the notification to rate the meeting after it is over.
Disable record meeting functionality to prevent the meeting from being recorded
Disable schedule for online room
Allow instant meeting (exhibitors): This enables exhibitors to create an instant meeting link which can be shared with other users to join. The link can be shared over a message.
Allow meeting request to inactive users: this enables to sending meeting request to users who have not yet activated their account
If “Allow meeting request to inactive users” is disabled, then even the Exhibitors wouldn’t be able to assign the inactive team members to any meetings with visitors/buyers.
Block time slot for pending meetings: This setting is enabled, it indicates the time slot as unavailable for scheduling another meeting if the user has a pending meeting scheduled for that same time.
Allow book in customer service mode: organizers can use the customer service button in a profile to impersonate that record and book a meeting on the participant’s behalf
Enable file attachment in meeting requests: allows user to attach the file or a document while scheduling a meeting, enabled on web meetings only
Allow instant meeting (visitors): This enables visitors to create an instant meeting link which can be shared with other users to join. The link can be shared over a message.
Meetings Auto Expire: As an organiser, you may define the time for an incoming meeting request to expire if not responded in a certain timeframe. By default, it is set to 72 hours.
Display days of the week: this will display days of week in meeting request data picker
Meetings autoconfirm: When the meeting is requested, it is automatically approved and appears in the section ‘Confirmed’. The time is blocked as well. This will hide pending and incoming statuses from the meeting filter. the rescheduling process still applies
If Autoconfirm toogle is enabled after the meeting booking has already started then it might overlook the allowed limit for the Online/Offline meeting set under Visitor/Exhibitor Category as all the meeting already requested by the user will get autoconfir
med overlooking the allowed limt set
Disallow meeting reschedule: The organizer can hide the Reschedule button from the meeting card on both the Web and App for specific user categories. The default state for this setting is OFF
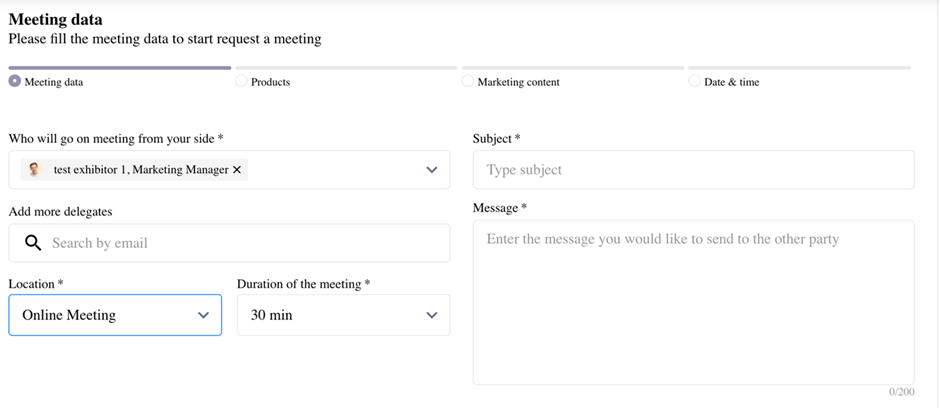
Use new flow for regular meeting request: This setting enables the new meeting flow for the participants of the event, where the availability of participants, meeting location, date & time works in co-relation to each other
Where to return user after meeting request: The organizer can now select where the user should land once the meeting request is sent successfully.
Meeting page: User will land on My Meeting page where last created meeting is highlighted in list of all meetings.
Page of Meeting initiation: In this case user will land on the page from where the meeting was initiated/scheduled with retained filters and pagination
Download My schedule in xls Format: If this setting is enabled it allows the end user and event admins to download the user schedule in xls format from both the admin panel (/admin/visitors?a=a & /admin/exhibitors/list) and frontend. It also records the details of personal block time of the user
Max meeting length: You can specify maximum duration of the meeting here. By default, this is set to 1 hour.
Meetings length default: You can change the default meeting length here. By default, it is set to 30 minutes.
Meeting time step: You can change the way the meetings are presented in the calendars, by periods of 30 minutes, 15 minutes or 10 minutes. By default, it is set to 15 minutes.
Different available slots for appointments can be set up where you can specify start and end timings as per your availability. If your exhibition/trade show is of more than 1 day, you can choose the days on which the delegate can fix the appointment and between what time.
Pause after Meeting: This setting adds a buffer between meetings meaning adds another time step between 2 meetings
Meeting Auto expire, Meeting Autoconfirm, Ability to attach files, Where to return the user after meeting request, Instant Meetings, Display days of week are web only features.
Offline and Online Time Settings
As an organiser, you may allow certain time slots where the users are allowed to book meetings. This can be done for both offline (at the venue) meetings and online (virtual) meetings.
The time slots can be applied for the whole event or the current month. Multiple time periods can be added.
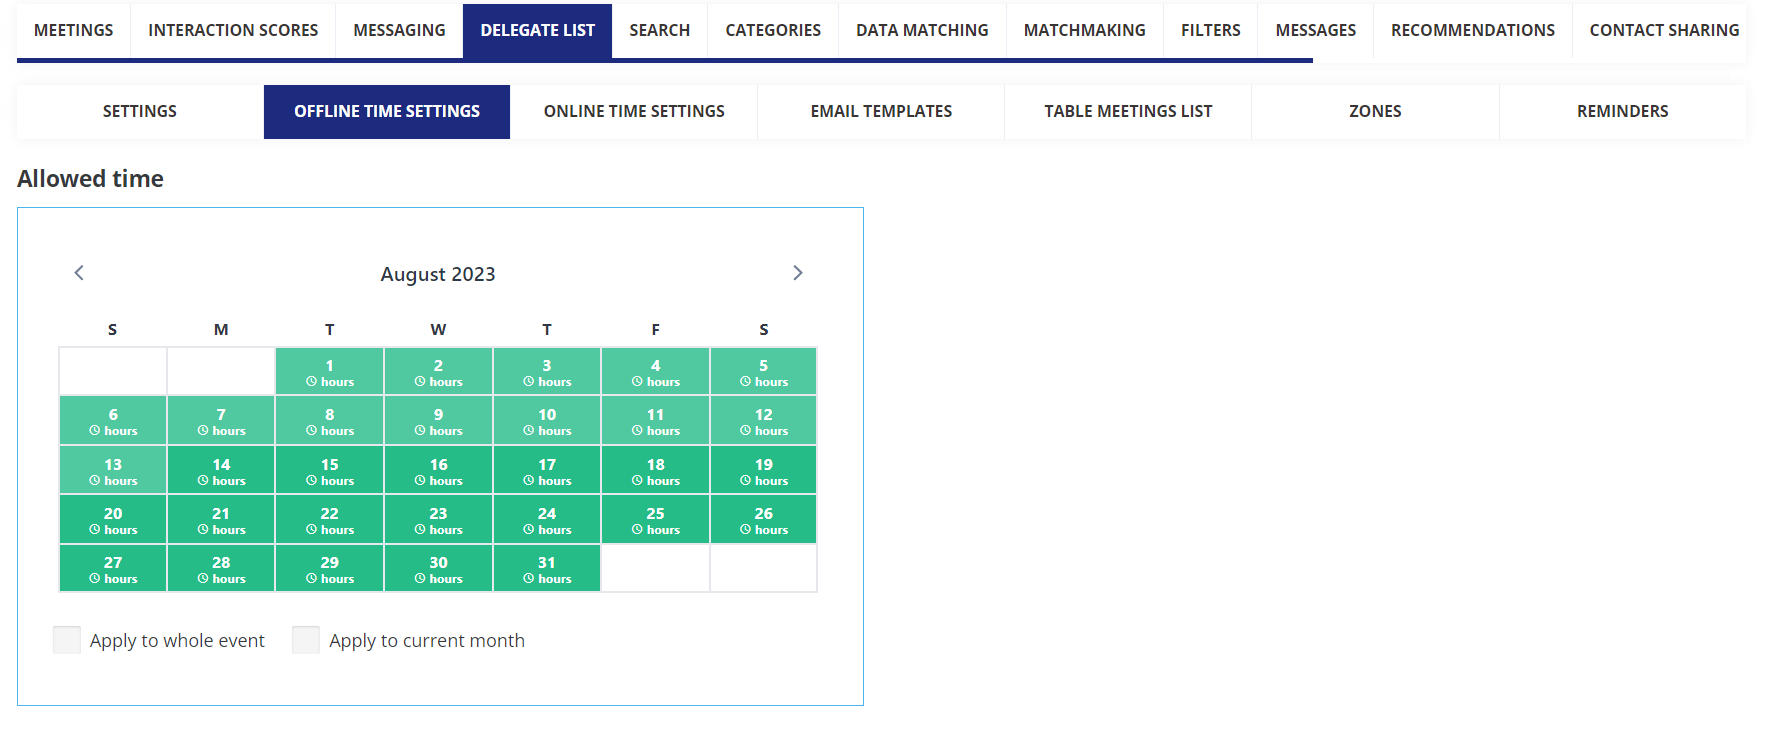
Offline Time Setting
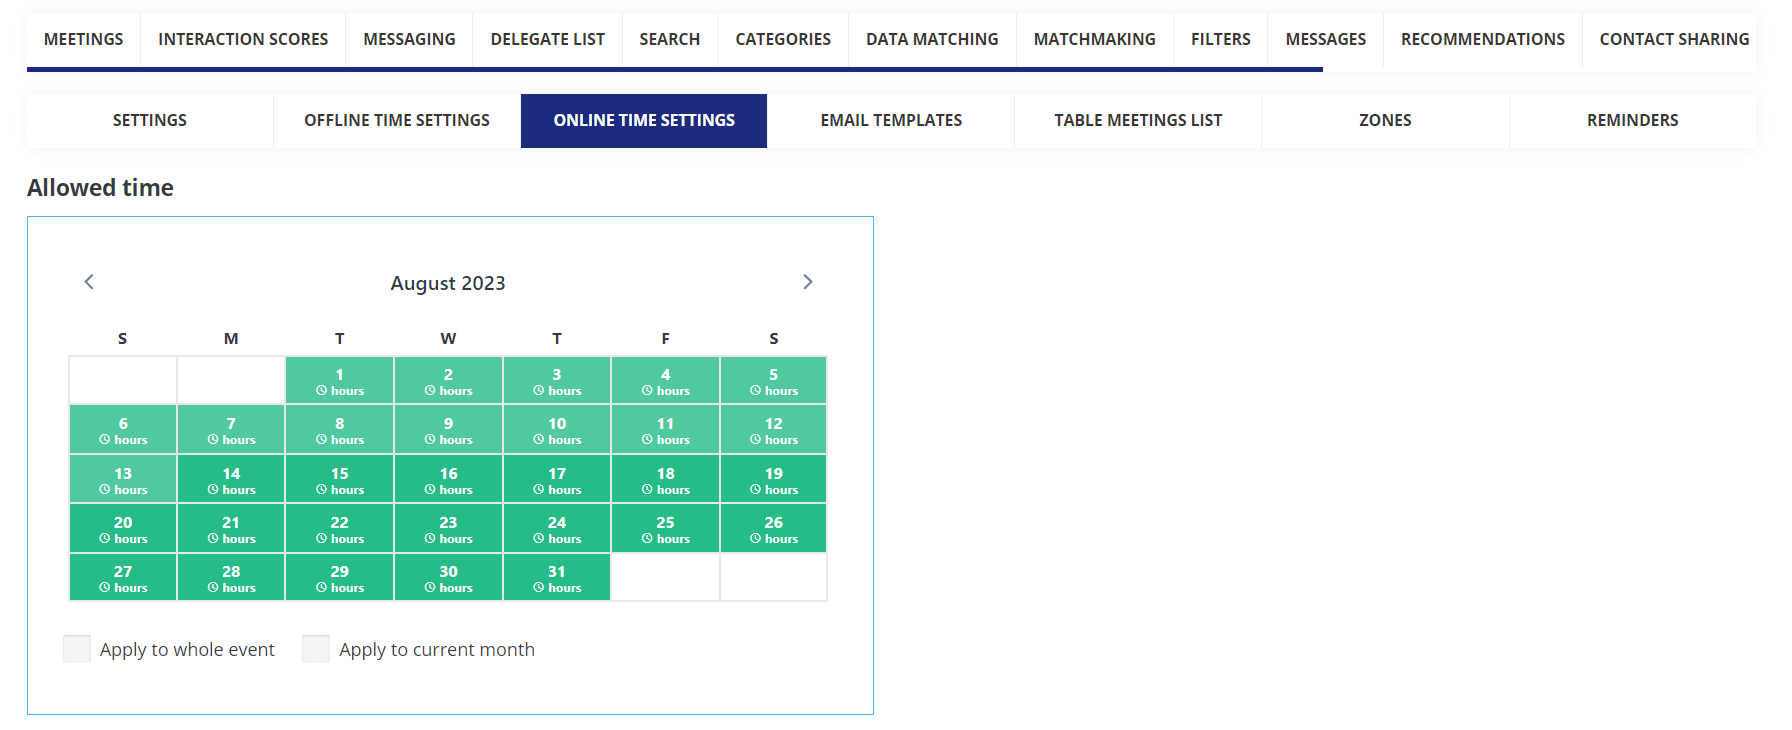
Online Time Setting
If the user’s current time (the time at which they’re making the meeting booking) is after the Allowed time for offline meetings, the user will only see ‘Online Meeting’ as the option to be selected under ‘Location’ while making the booking.
Add Blocked Time(front end)
Users can now add the blocked time while they are not available for the meeting from the frontend
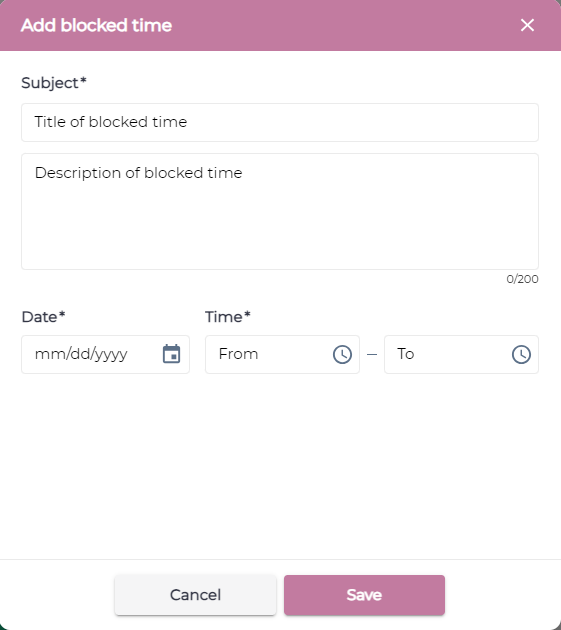
Under My Profile → Networking → My Schedule → Add Block Time button, allows the user to block certain times for the day when they are not available for the meeting.
Users can add the Title, Description, Date and Time when they are not available for the meeting. When other users are trying to book a meeting with this user then the slots which are blocked by the user will not be available for the meeting.
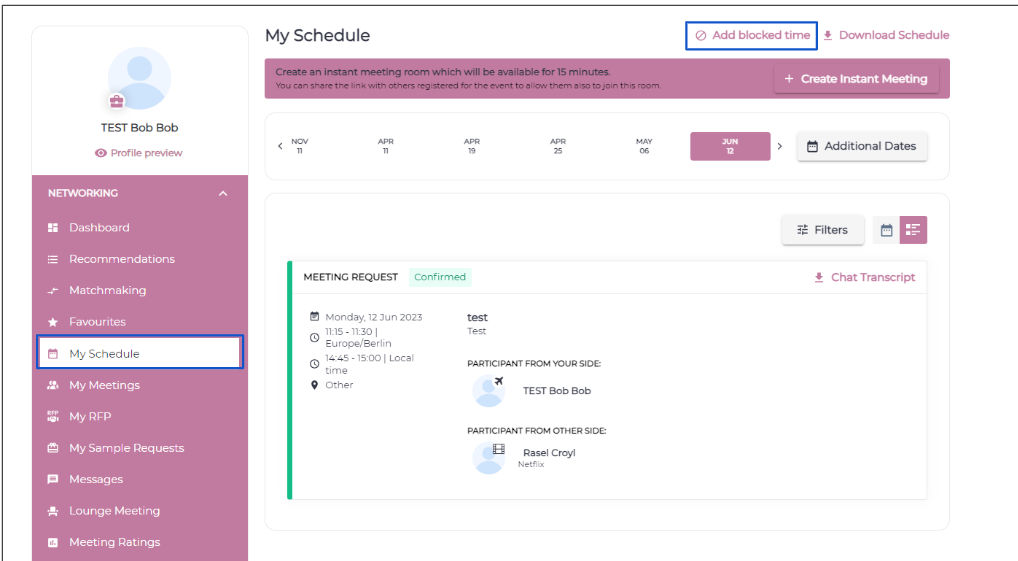
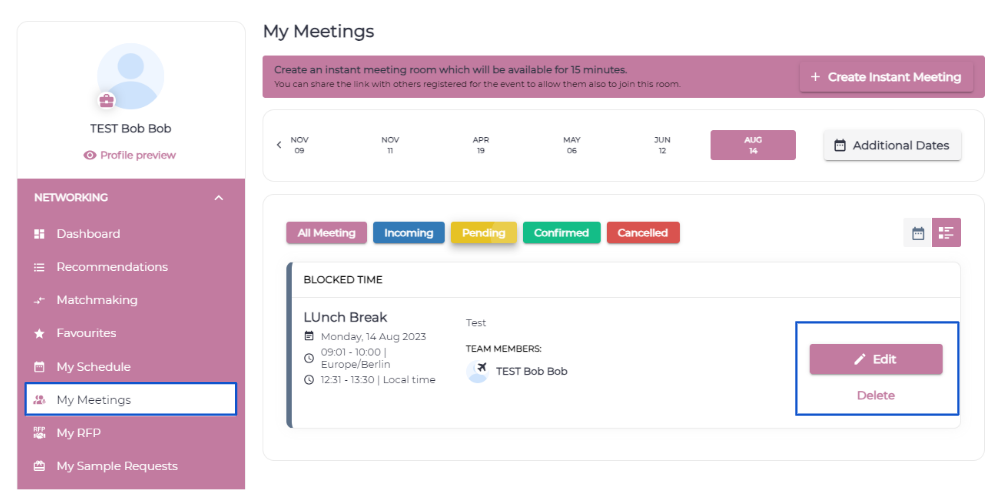
The user's blocked time details will be displayed under his My Meeting and My Schedule tabs, where they can be Edited or Deleted as needed.
List View
Calendar View
For Exhibitors with Team Members, it would show blocked time cards indicating to which team members it was applied.
If the blocked time were created as a bulk action – all team members would be combined into a single card.
If that blocked time was created for every team member separately, there will be multiple blocked time cards with only one team member on a blocked time card
If the team member makes any changes to the blocked time or deletes it, this is done only for his profile and will not affect to other users.

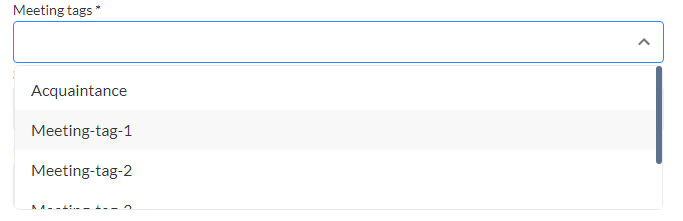
Meeting Tags
A meeting tab option is now available for back-end and front-end users. This allows to add an extra level of information related to the purpose of the meeting
Meeting tags can be enabled under Networking & Matchmaking=>Meetings

Once enabled, you have several options available under “Manage Meeting tags”
Add New Tag
Use for: Table meeting / Regular Meeting / Regular & Table Meeting
.png?inst-v=8531b658-bb1f-4fa3-8a3e-3bf9395329ca)
Show at: Back end only / Back end & Front end
.png?inst-v=8531b658-bb1f-4fa3-8a3e-3bf9395329ca)
if meeting tags are enabled on the front end, a new drop down option will allow the requestor to add this tag in the meeting request, and will be displayed in the agenda
Reminders:
There are three different options available to set up meeting reminders, as explained below:
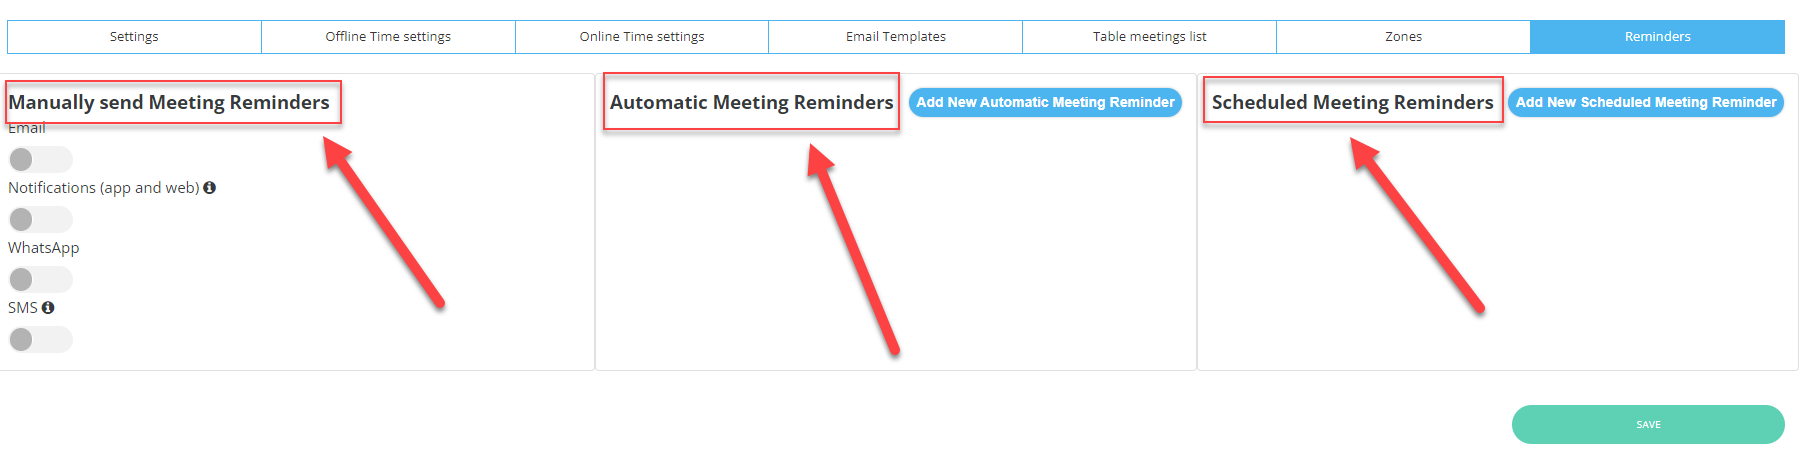
Manually send Meeting Reminders: | Automatic Meeting Reminders | Scheduled Meeting Reminders | |
|---|---|---|---|
Back Office | 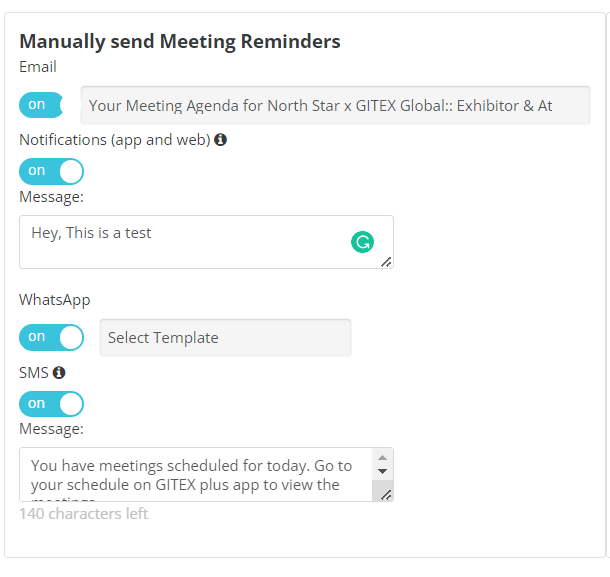 | 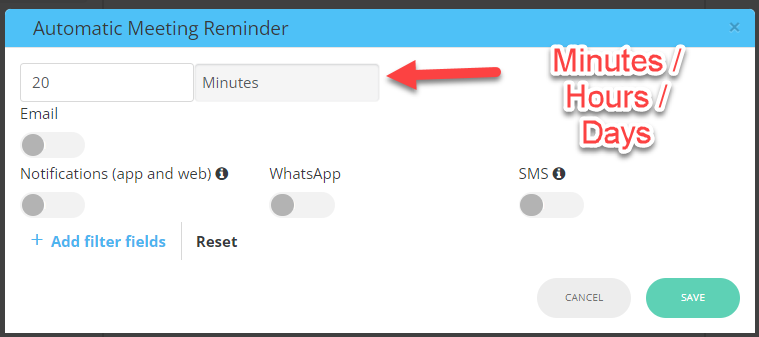 | 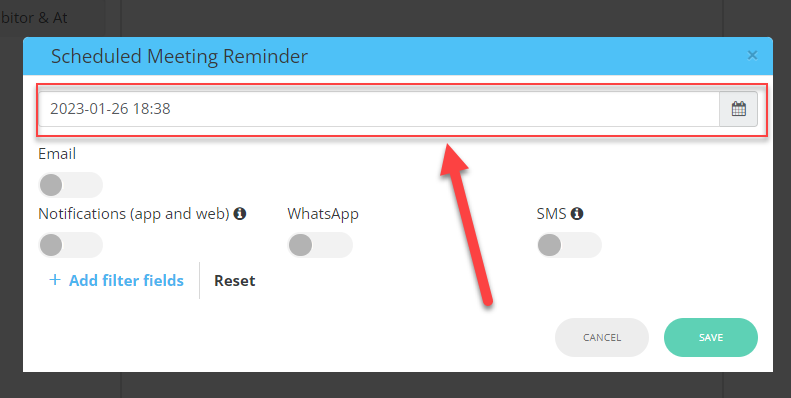 |
Type | A generic reminder message with an attached pdf agenda and a call to action directing the user to their schedule. | The user will receive an automated reminder for all confirmed meetings separately. | A generic reminder message with an attached pdf agenda and a call to action directing the user to their schedule. |
Trigger | Manual | Automatic, as per configured frequency ( x = Days, Hours, Minutes) | Pre-scheduled at a specific date & time |
Channel | Whatsapp, SMS, Email, Web, App | Same | Same |
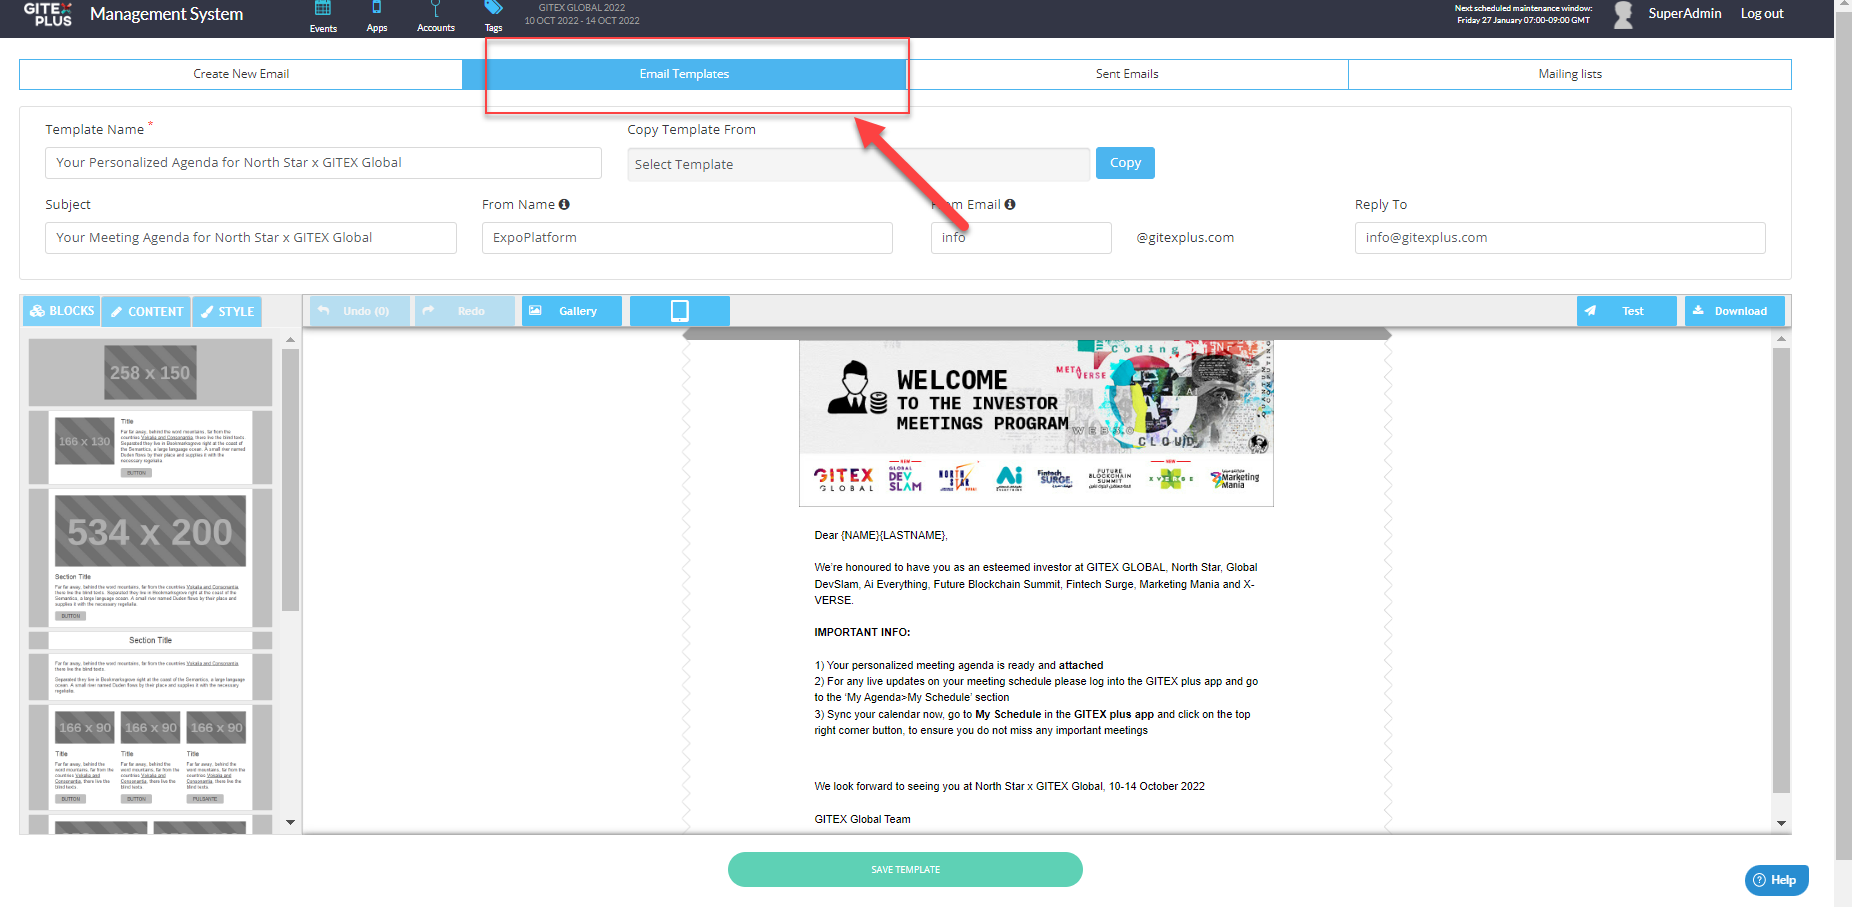
Emails can be configured in marketing section of the platform. (Marketing → Email Sender → Email Templates
Meeting reminders via WhatsApp and SMS have a cost associated with them. To have this feature activated for your event, contact the TAM lead assigned to your project.