
Exhibitor Events
Organizers can now give exhibitors the flexibility to create exhibitor events on the front end, which can be controlled at the category level (or) individual level. The first step to configuring this is turning ON exhibitor events in module management (/admin/general/modules).
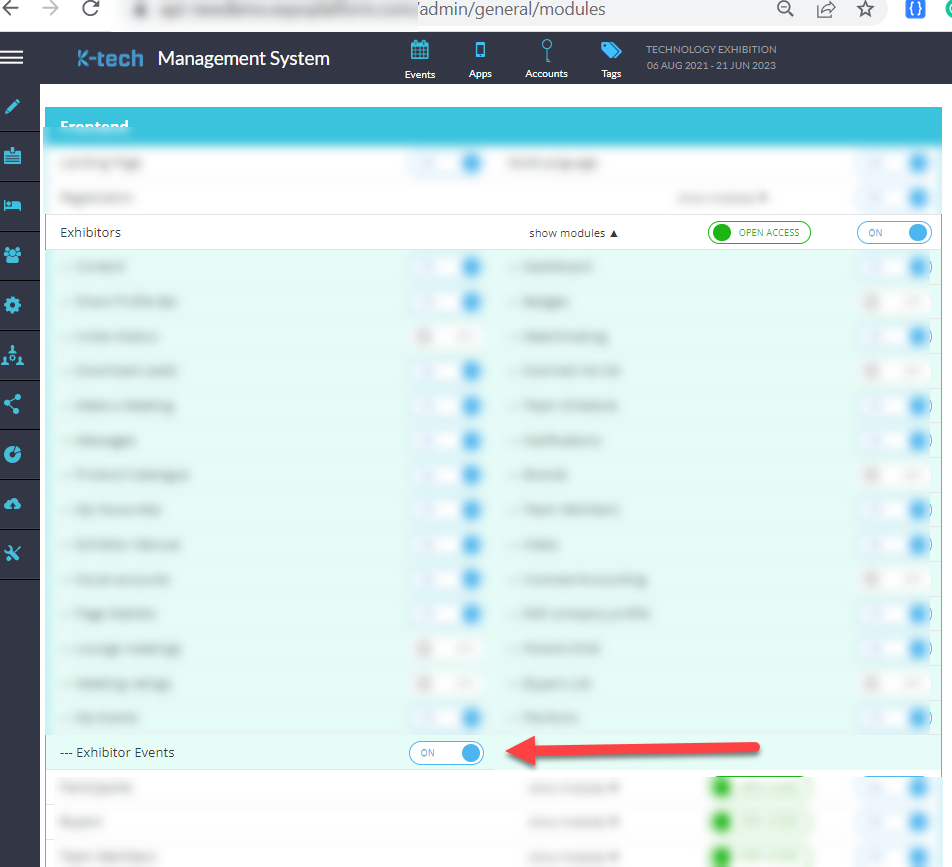
Once Exhibitor Events are enabled at the Module Management level, organizers need to enable them at the Exhibitor Category Level. This allows all exhibitors within that category to create exhibitor events from their front-end profile. Alternatively, Exhibitor Events can also be enabled at the individual exhibitor level from the exhibitor edit page on the Admin Panel.
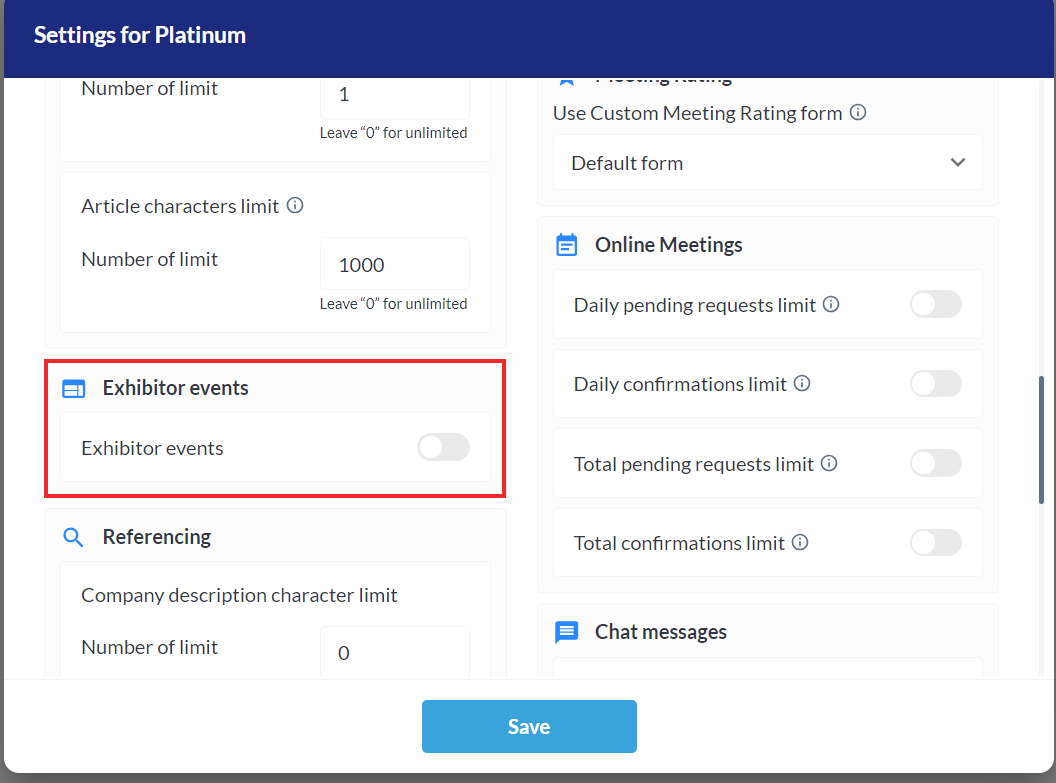
Exhibitor Category Level Allowance
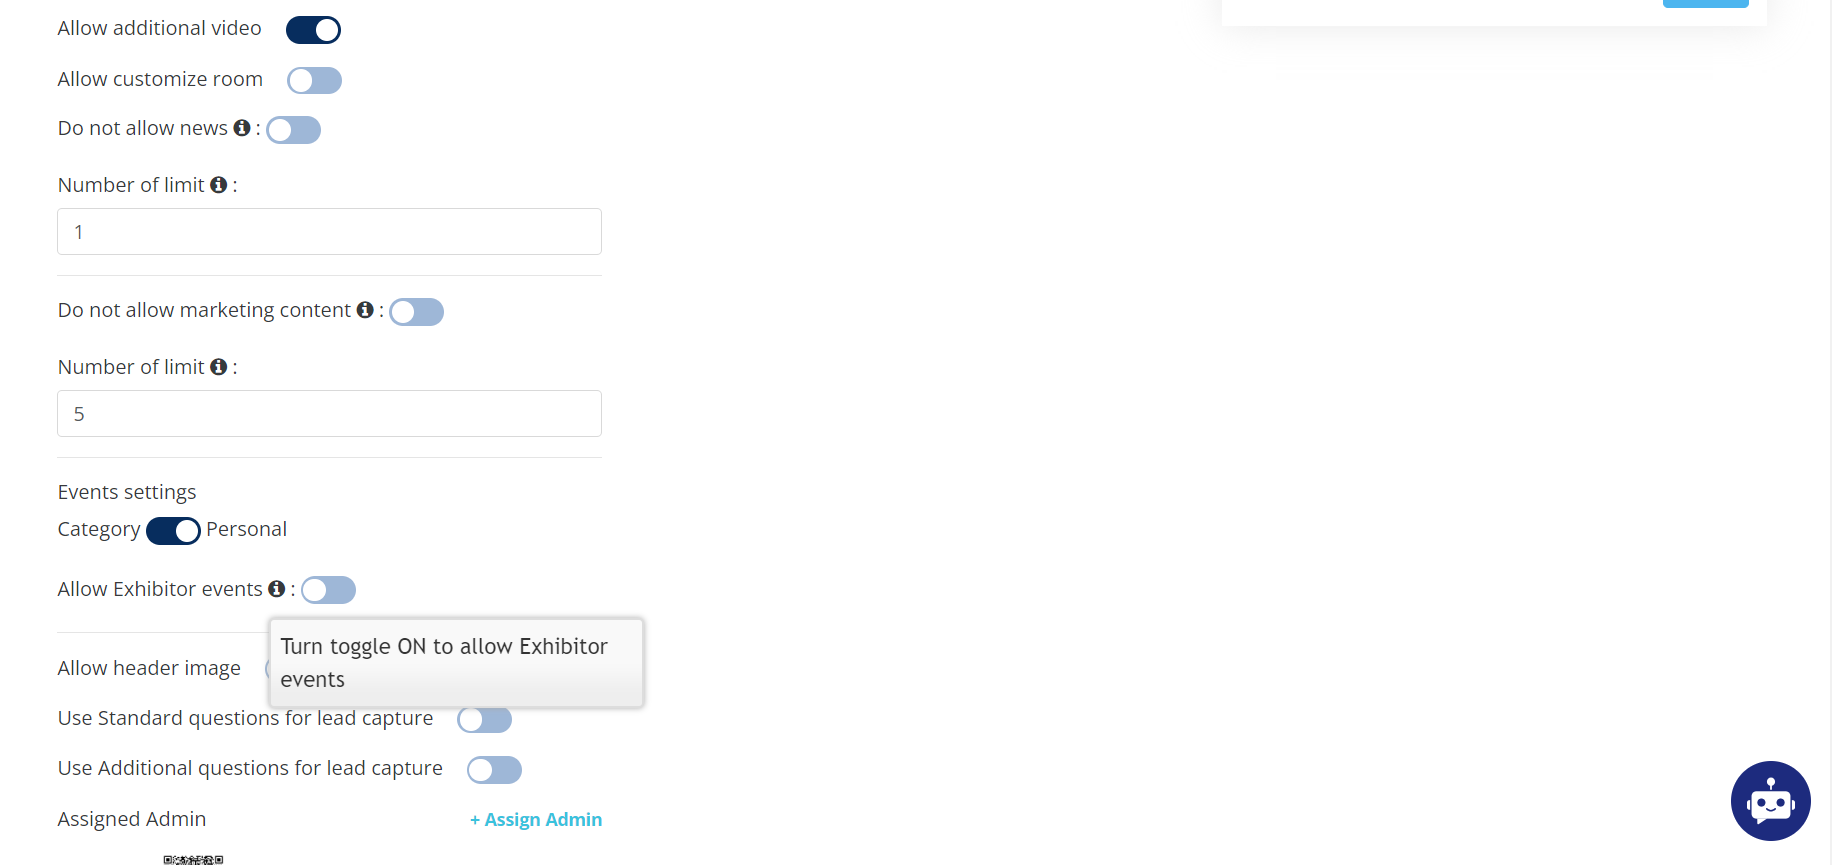
Exhibitor Individual Level Permission
Configuration:
Global Configuration (admin/events/config):
Here, you will be able to configure global settings for exhibitor events which will govern the output of the page presented to the exhibitor at the time of the creation of an exhibitor event.
Default State: OFF
Backend | 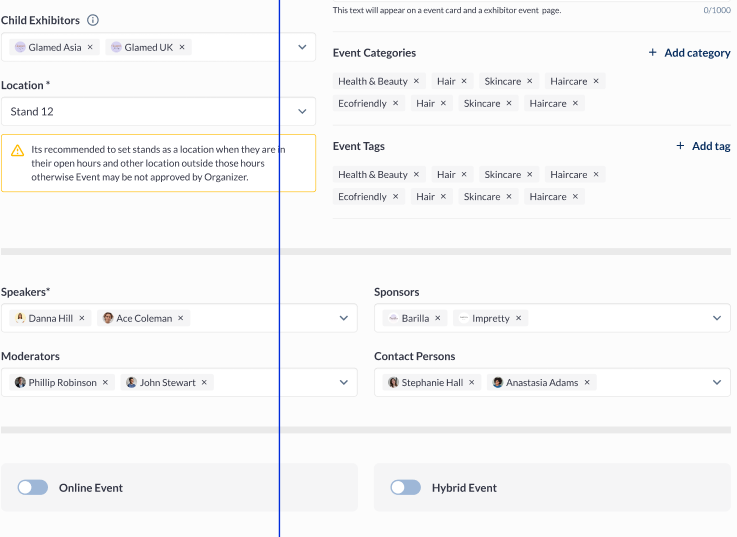 Frontend |
Speaker, Moderator, and Point of Contact can be the team members for the exhibitor creating the event.
If allowed by the organiser the session speakers and moderators can also be added as the speakers and moderators for the exhibitor events.
Admin Panel Settings: Management → Session → Session Config → Exhibitor Events → Checkbox setting Sessions Speakers/Moderators available for Events
Exhibitor event automatically blocks speaker & moderator schedule but not for POC (POC is just a representative visible on cards)
Setting Up Limitations:
Limitations can be set both at the individual or category level, as explained below:
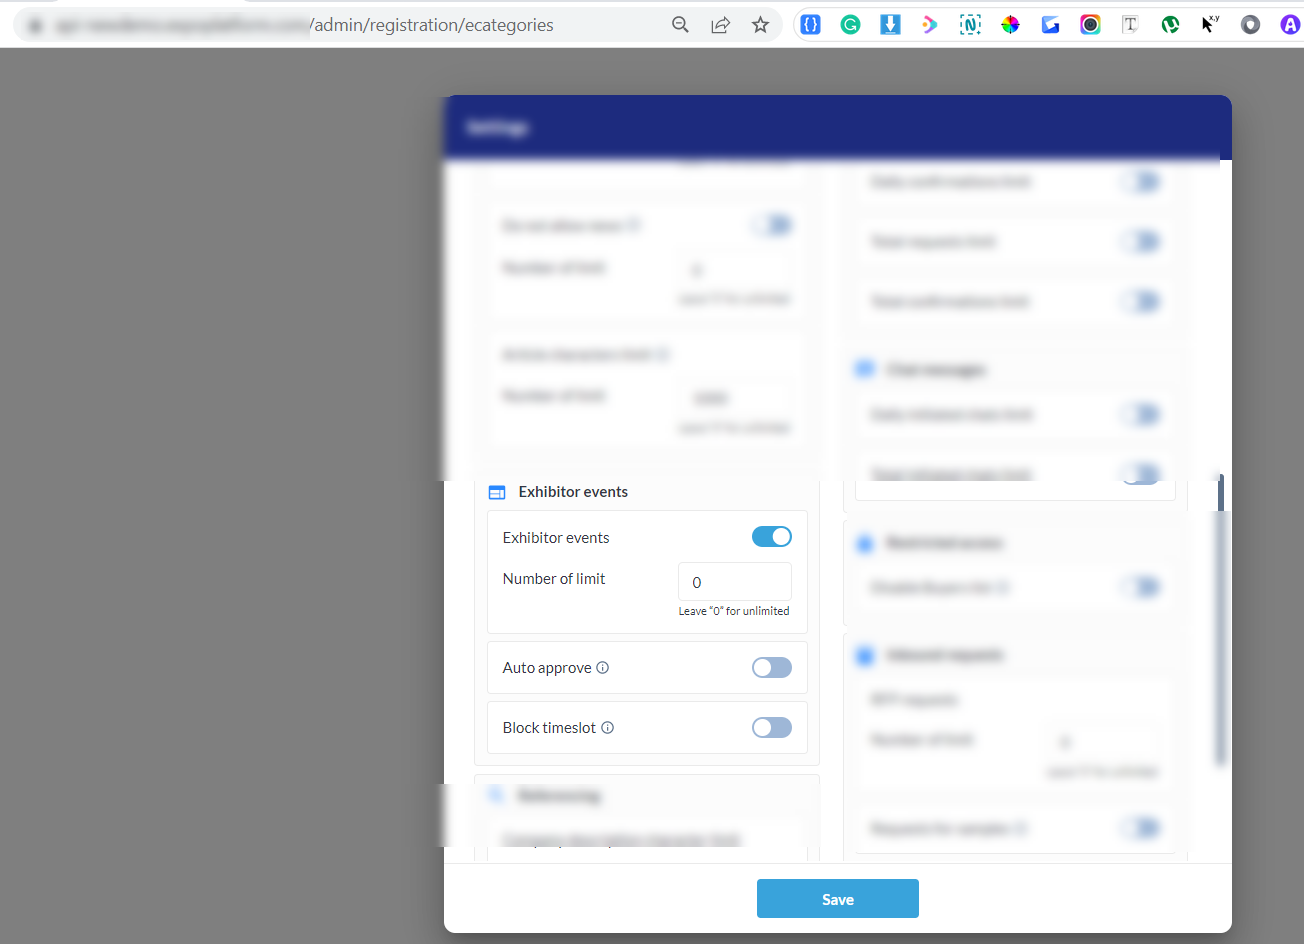
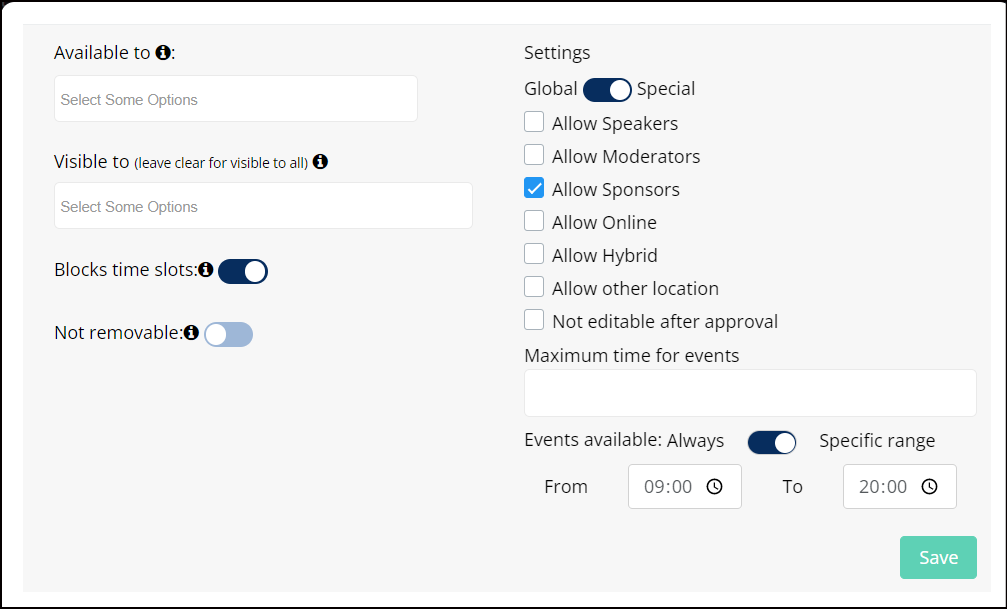
Category Level
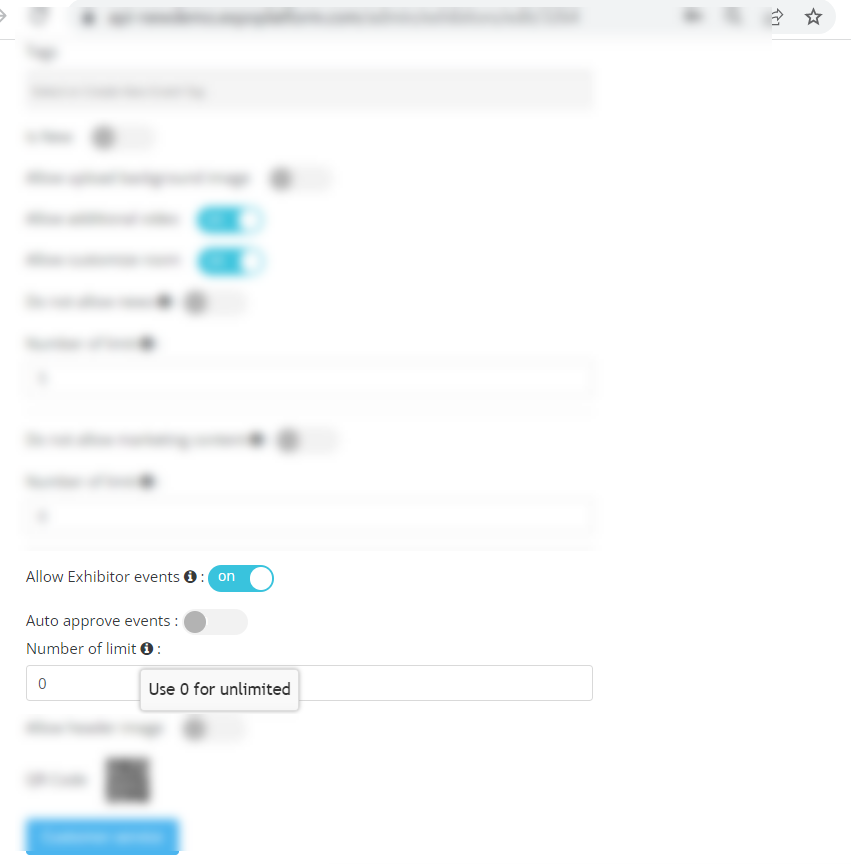
Individual Level
The individual settings done on the exhibitor level take the precedence.
Tracks, Types, Tags, and Sponsors are shared with regular sessions (configured at the backend)
Type once selected cannot be changed for an event (backend or frontend)
Admin Panel:
Exhibitor Events are visible alongside regular sessions created by the organizer in the Sessions list in Management Sessions.
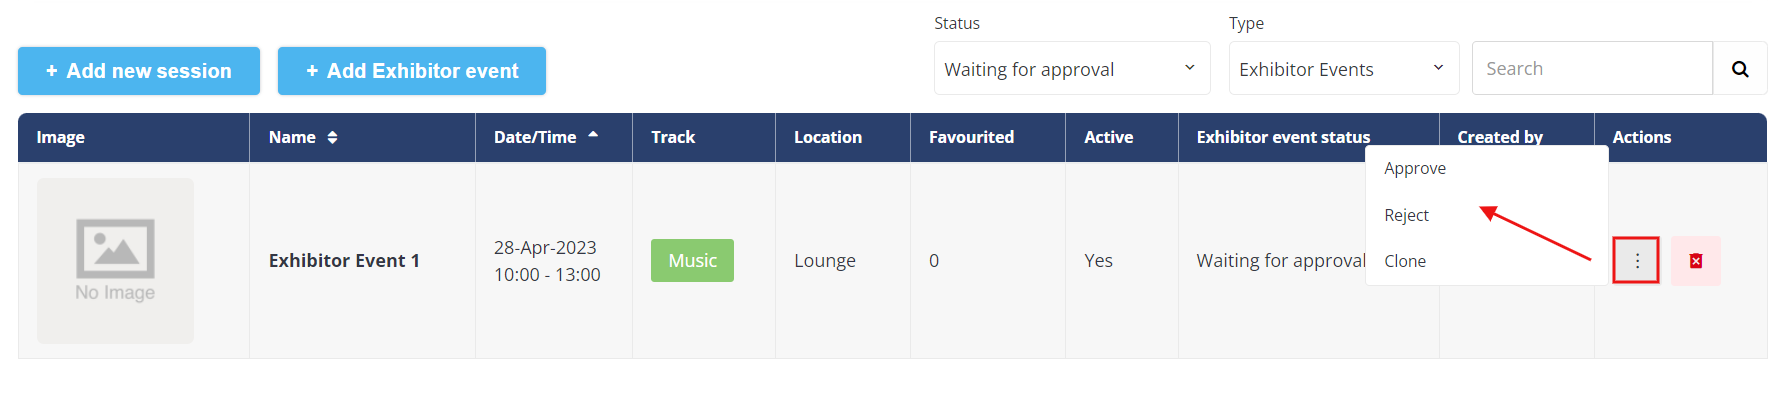
Exhibitor Events consist of additional buttons in a list:
For “New Events” status, it would be “Approve”, “Reject” and “Reject for security concerns” – to approve and reject Exhibitor Events
Reject for security concerns duplicates the "Rejected" status, but exhibitors cannot resubmit changes to it. Therefore, this status cannot be changed and is final.
For “Edited” status, it would be “View Changes”, “Approve changes” and “Reject changes” – The organizer can prefer to view the changes first before approving or rejecting changes to previously approved Exhibitor Event.
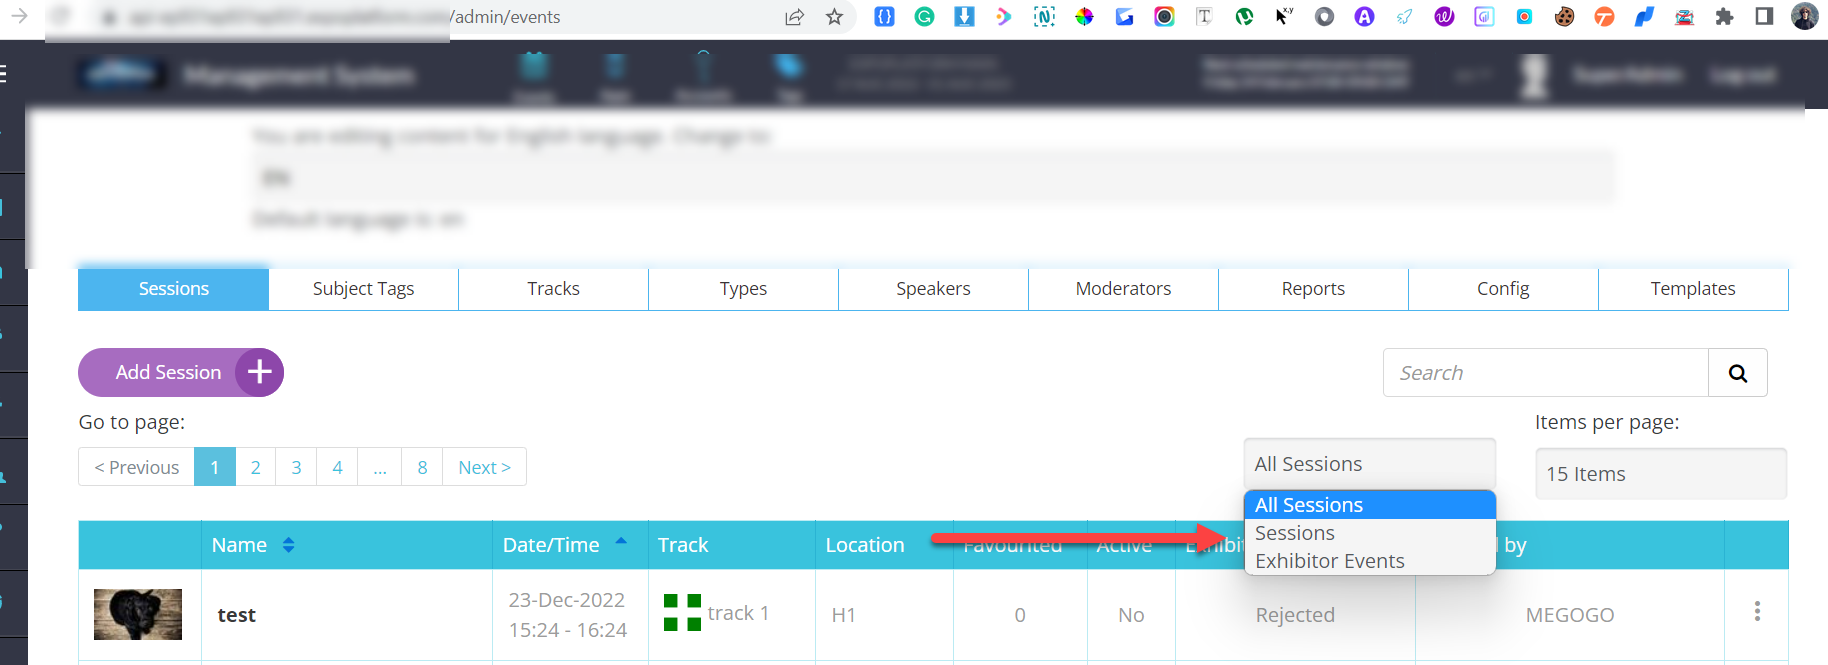
Filtering Exhibitor Events
New Event(Waiting For Approval)
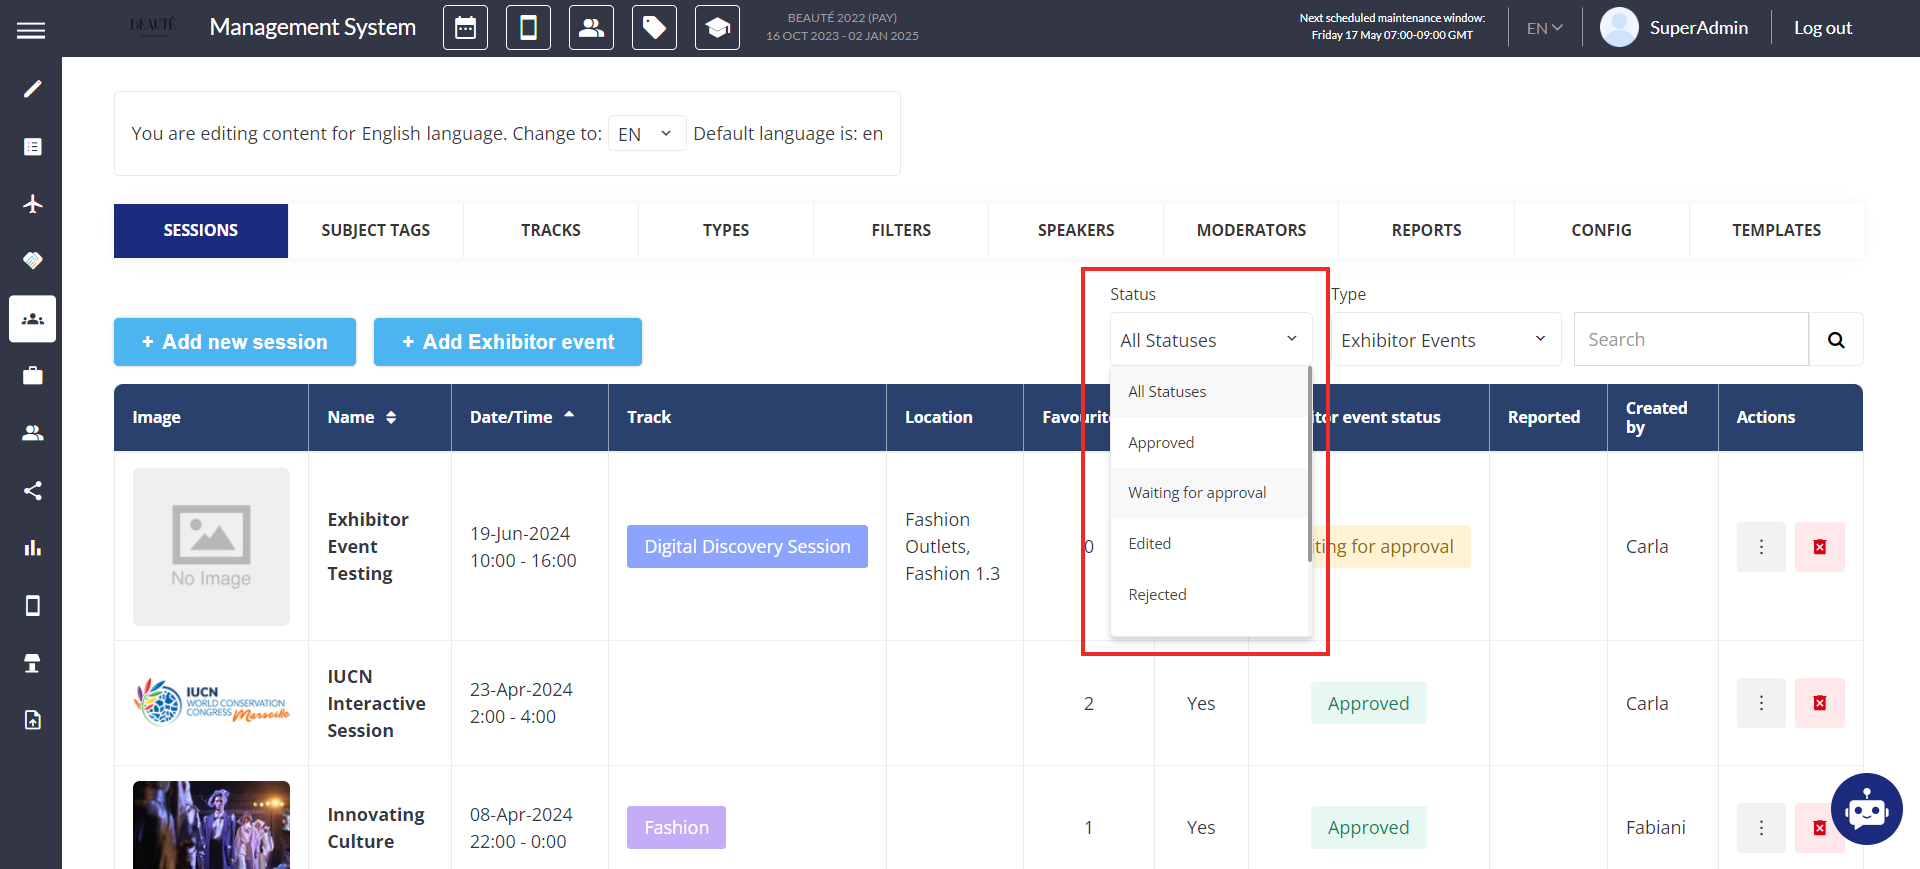
Sorting Exhibitor Events based on Status
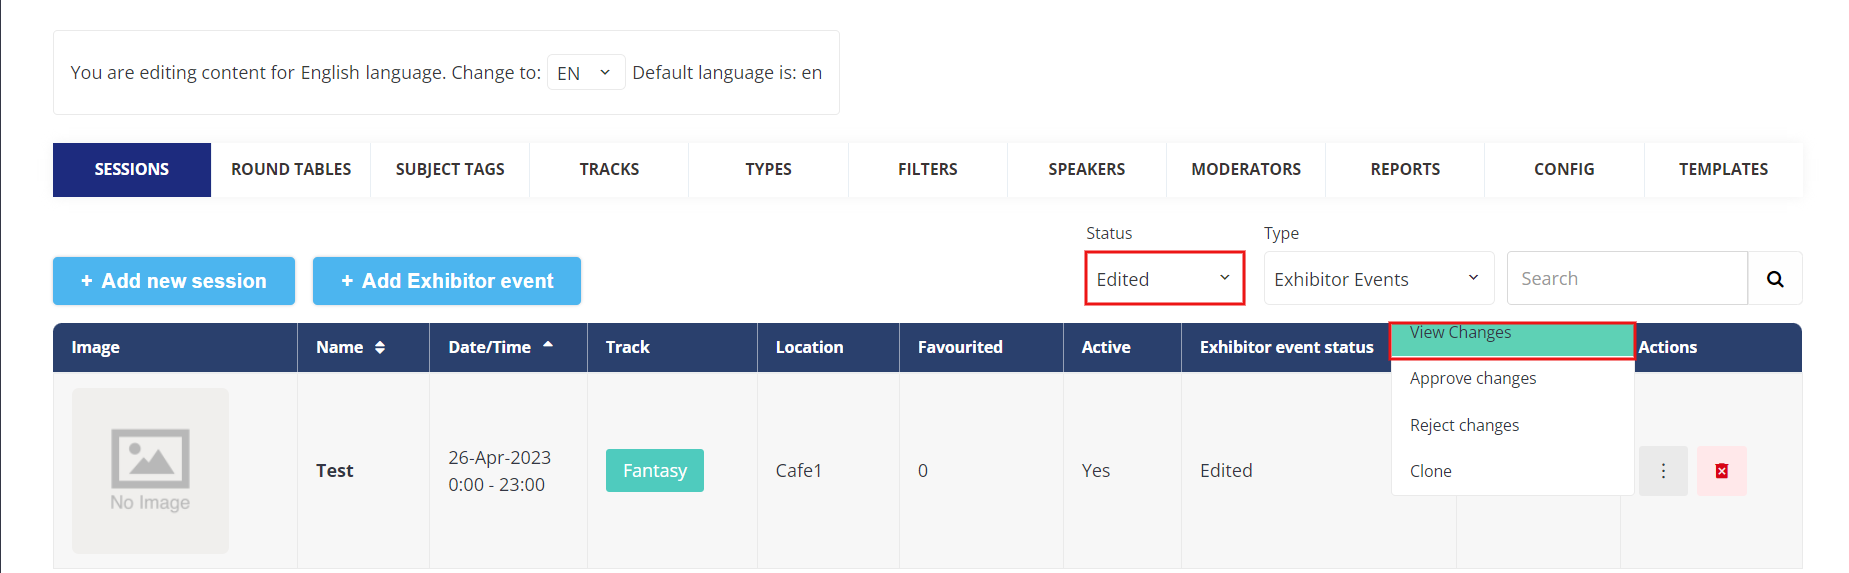
Edited - Already Approved Event
Additionally, the approval/rejection process can be handled by browsing through the exhibitor event-specific page.
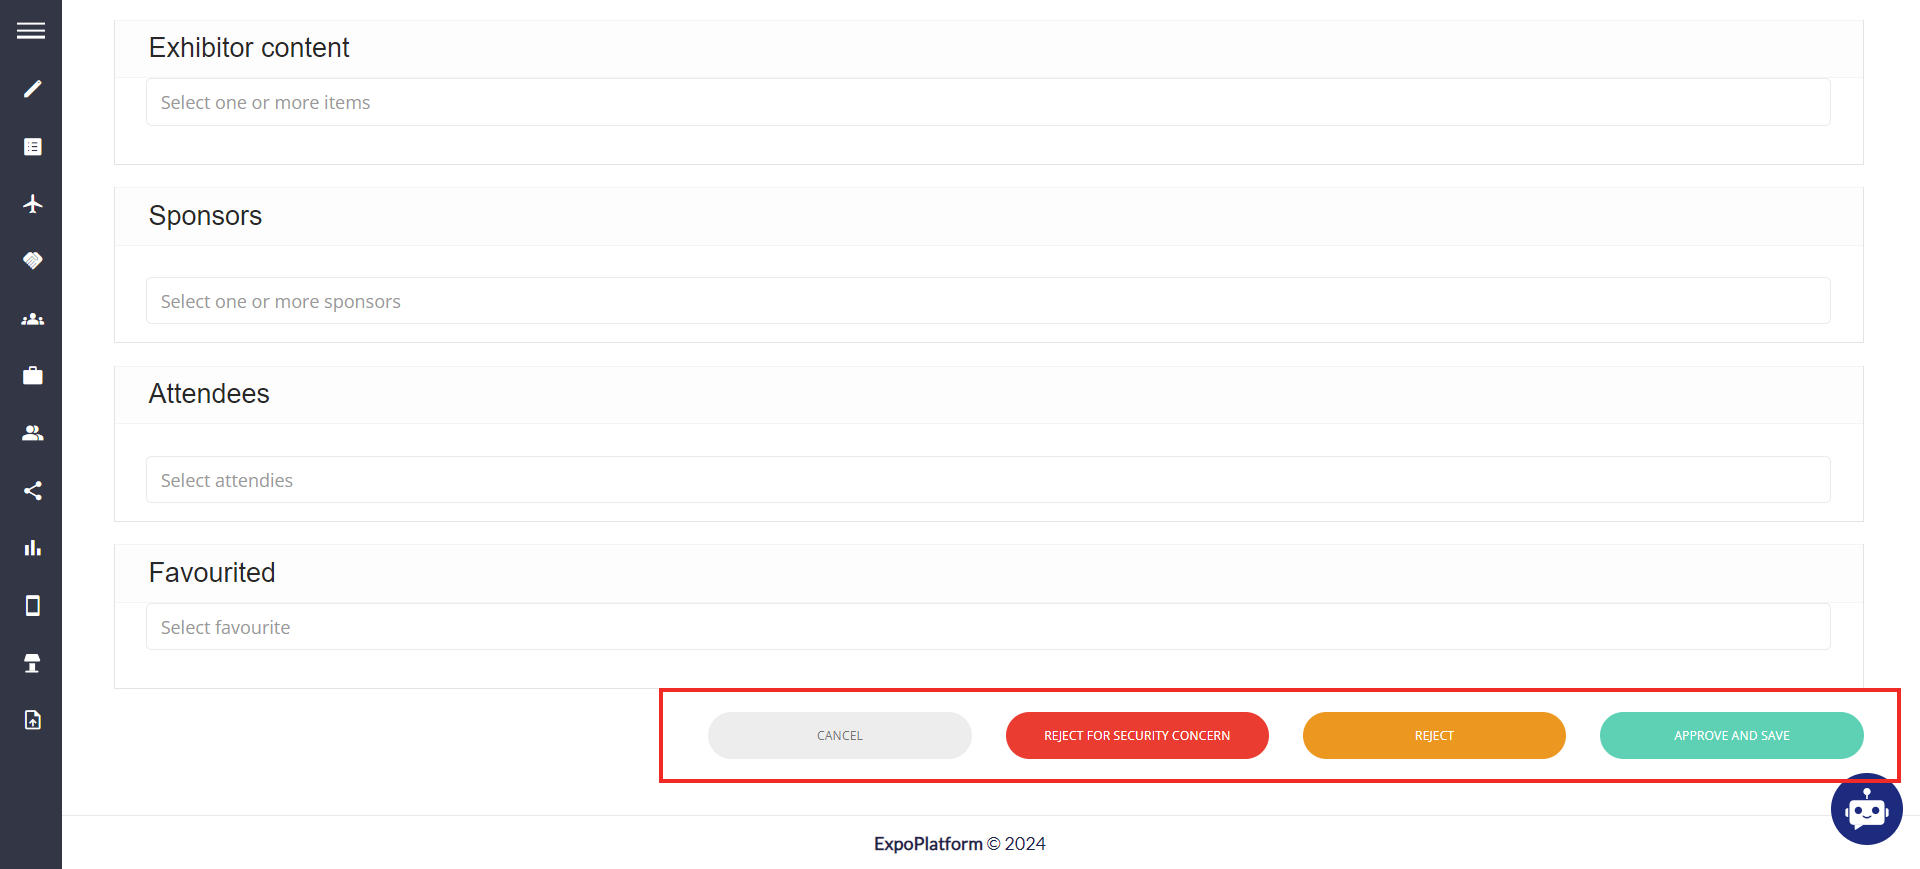
Approving/Rejecting Exhibitor Event
Status Logic:
Once an event is approved, it can only be deleted (not rejected).
Additional Settings:
Track Level: Availability of exhibitor events to a certain category type can be controlled at the type level Available to is applicable to both frontend & backend | 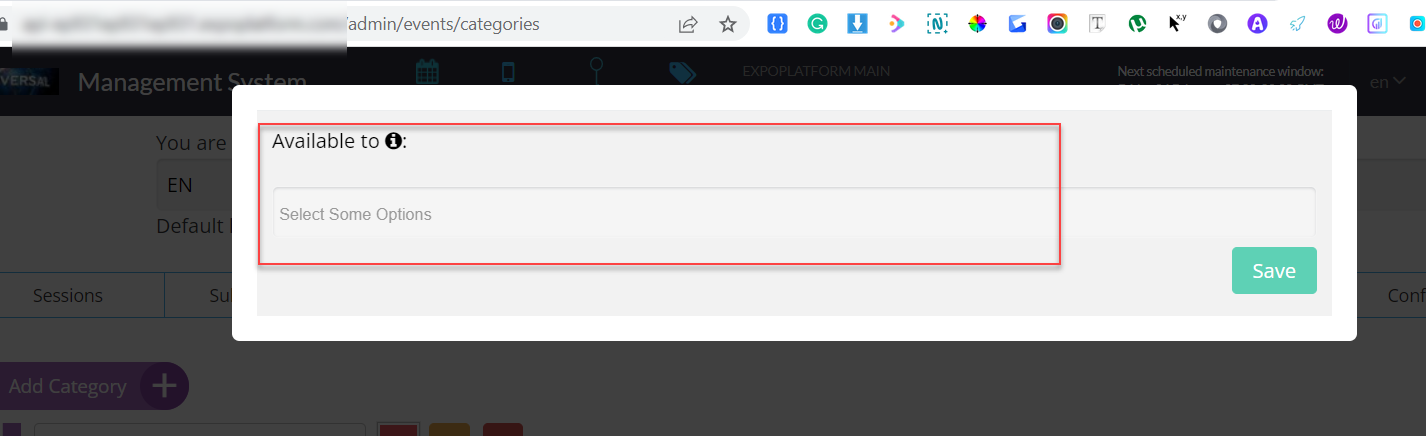 |
|---|---|
Type Level:
Available to is applicable to both frontend & backend
|  |
Default State: OFF
Dashboard Frontend
The system additionally records information about users who have scheduled/booked for exhibitor events in Lead Download reports and Dashboard Interactions.
Admin Panel Settings → Networking & Matchmaking → Contact SHaring → enable toggle Booked an Event
Default State: Off
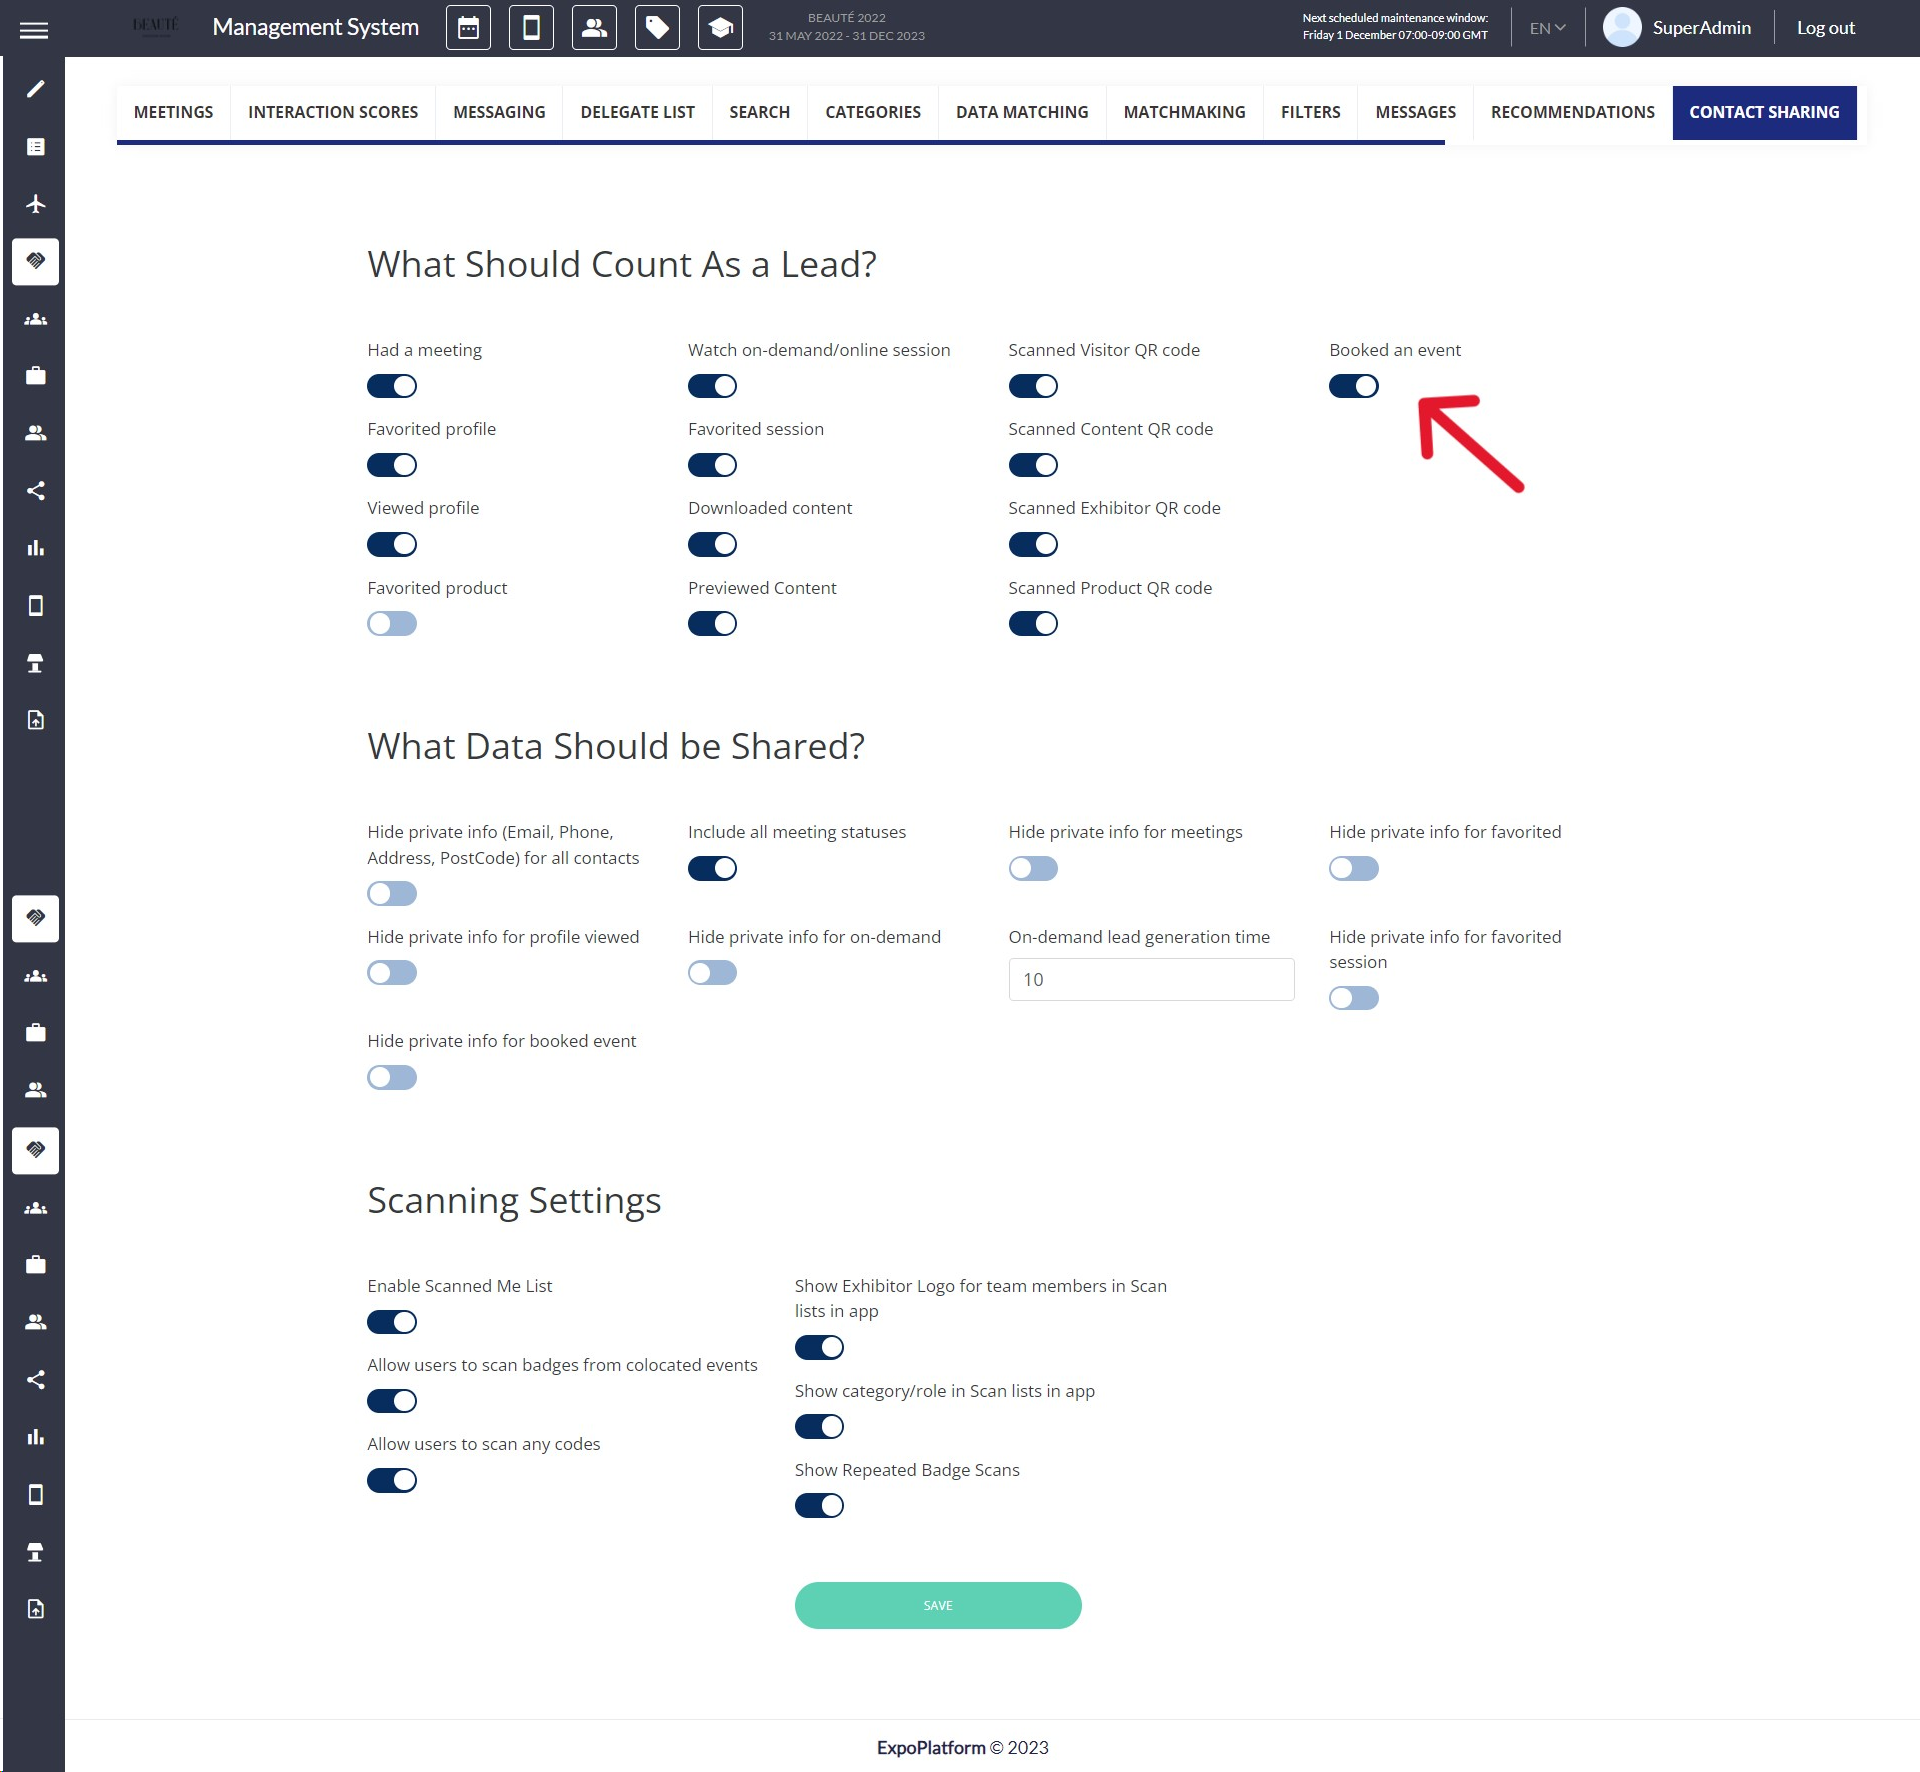
Contact Sharing
A new column will appear in Dashboard Interaction if this setting is enabled. Only exhibitors whose profiles have exhibitor events listed will see this column
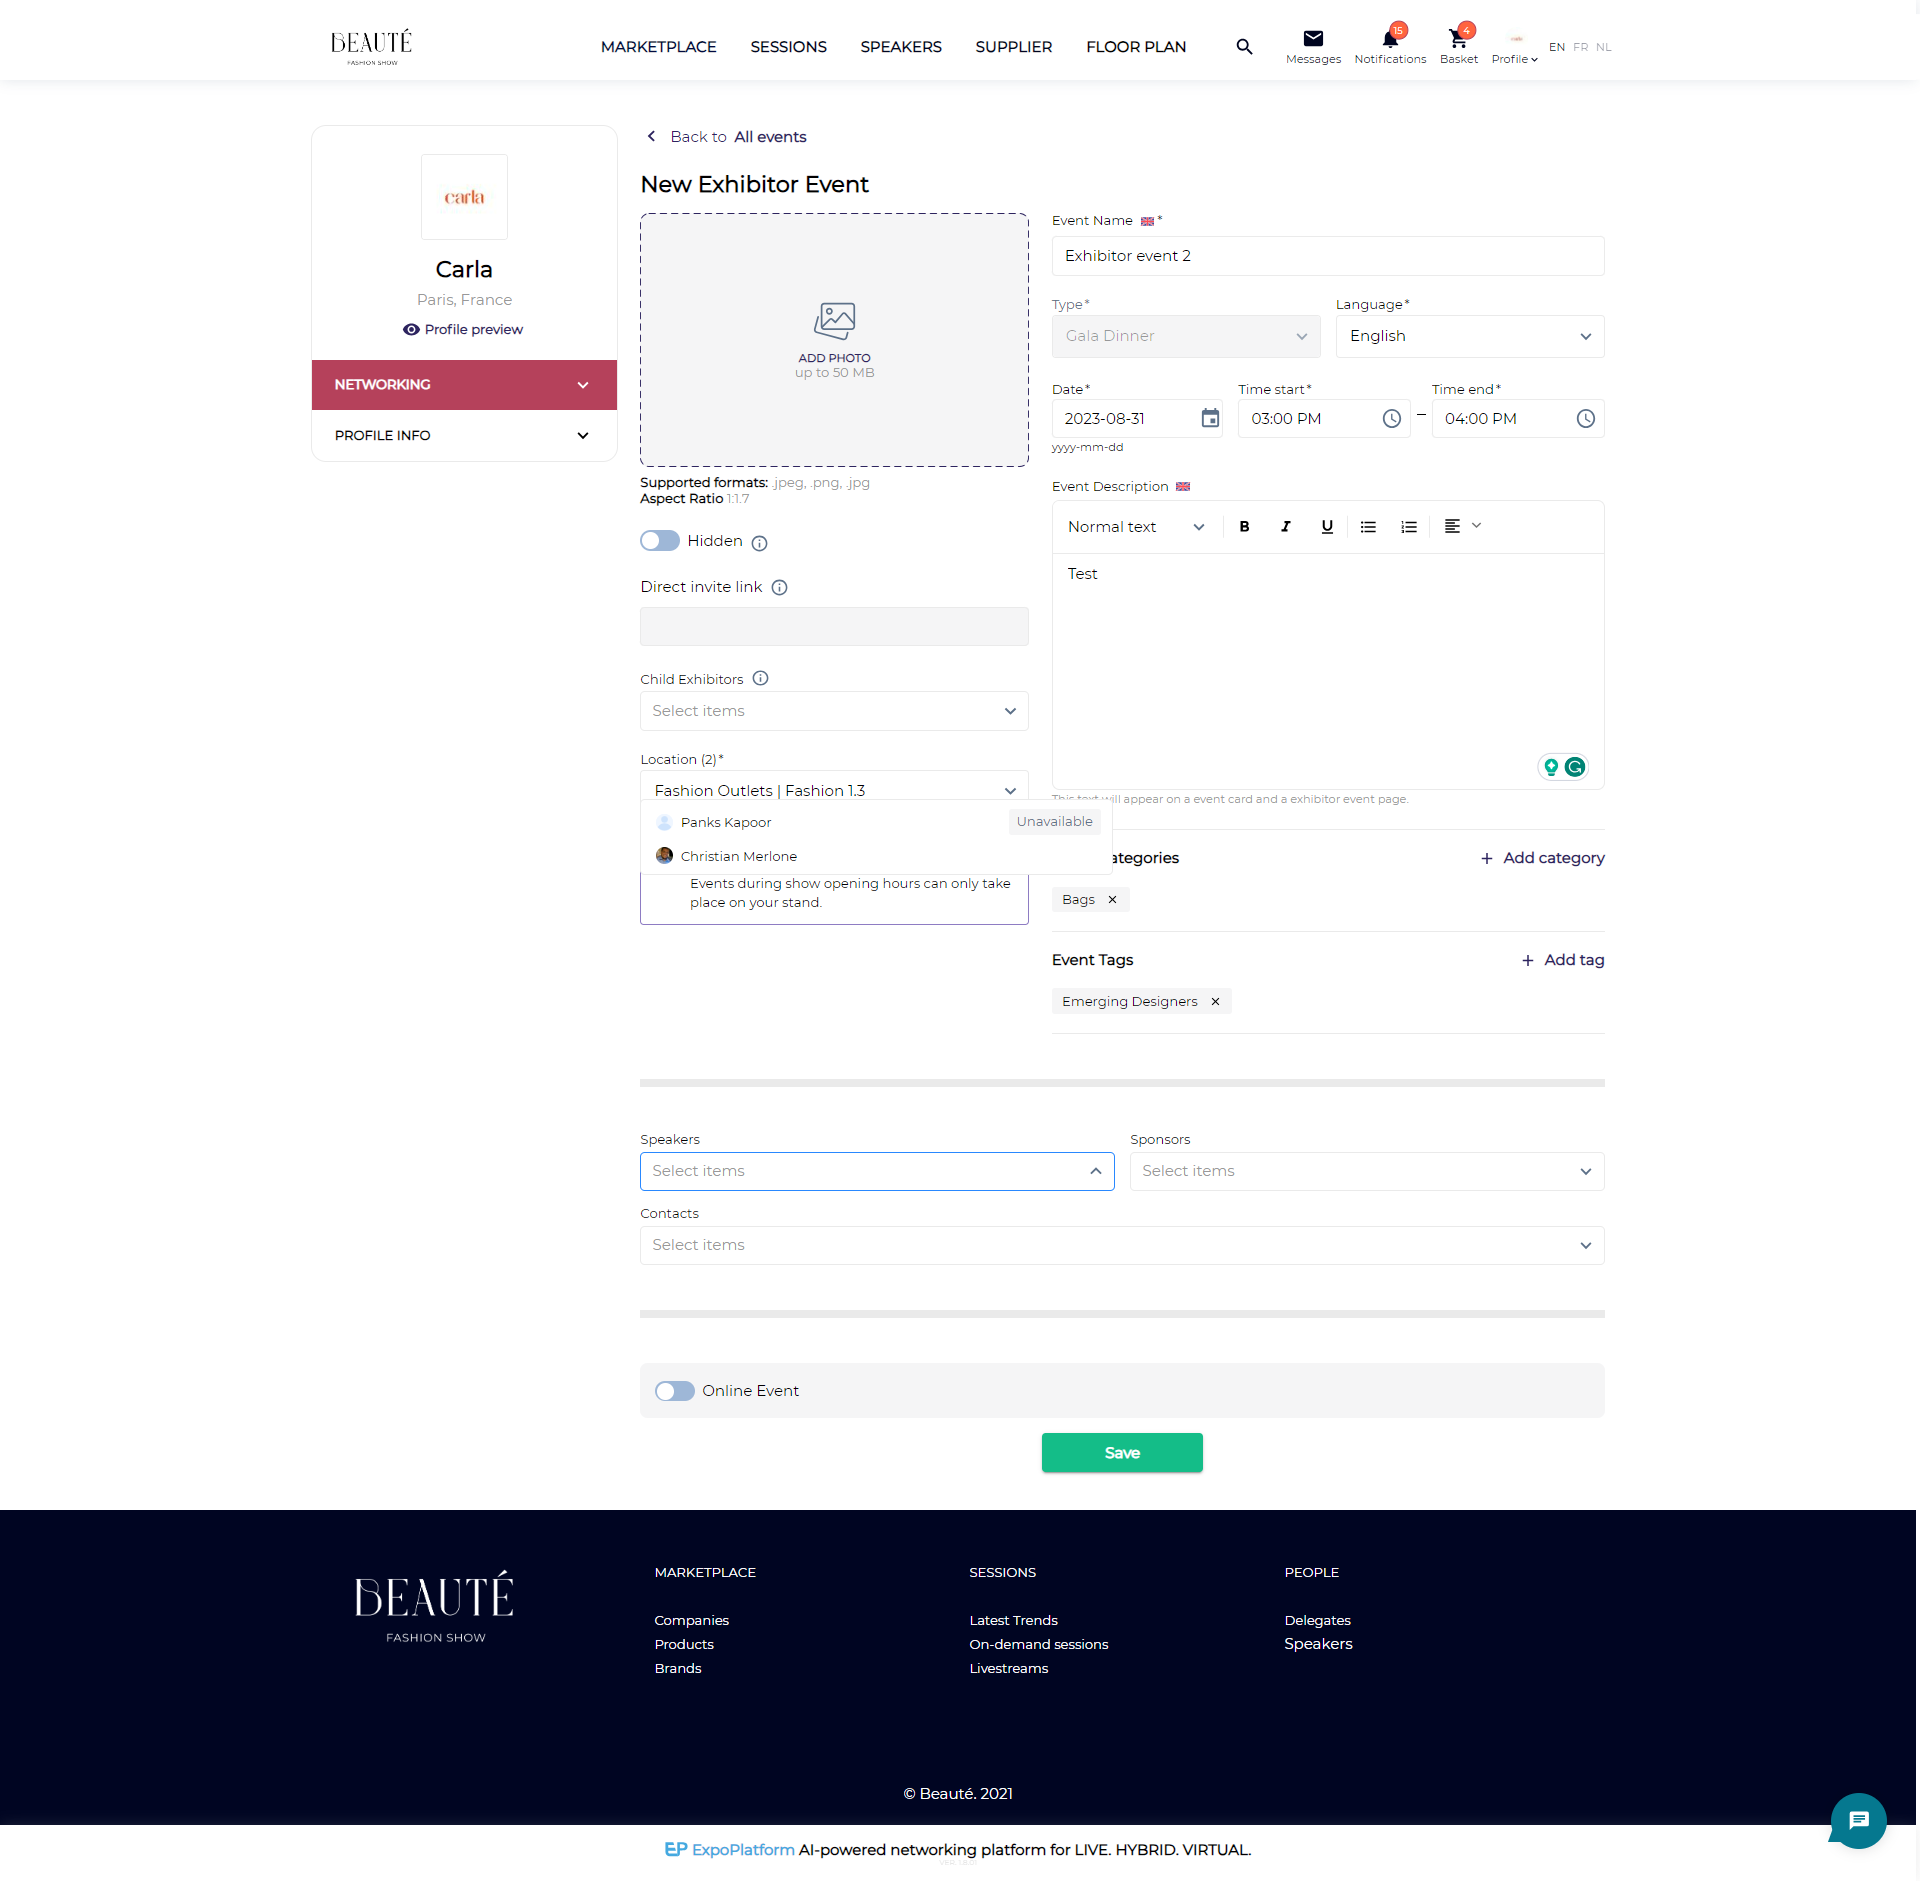
Ignore blocked time for adding Speakers/Moderators: If this setting is turned off, an exhibitor tries to add a speaker or moderator to their event, and the intended time slot for that user is already blocked by another item (blocked time from any source like a confirmed meeting), the system will display the tag unavailable for that speaker/moderator and will not be added to the event.
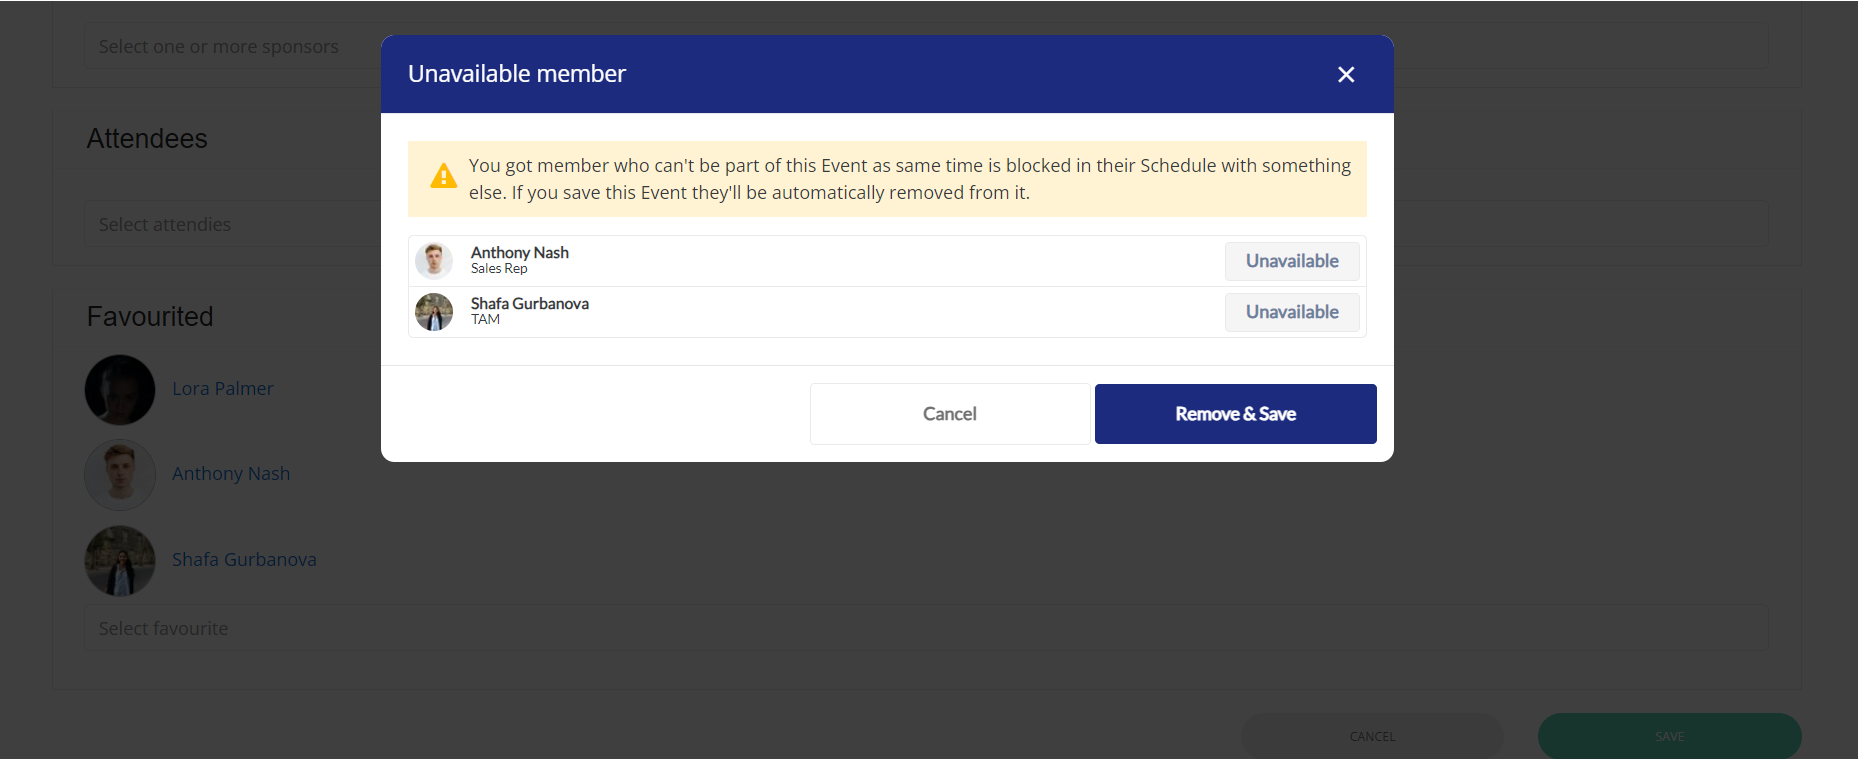
Pop Up message that added speaker/moderator not available
To find this setting Go to Admin Panel → Management → Session → Session Config
Exhibitor Event Config
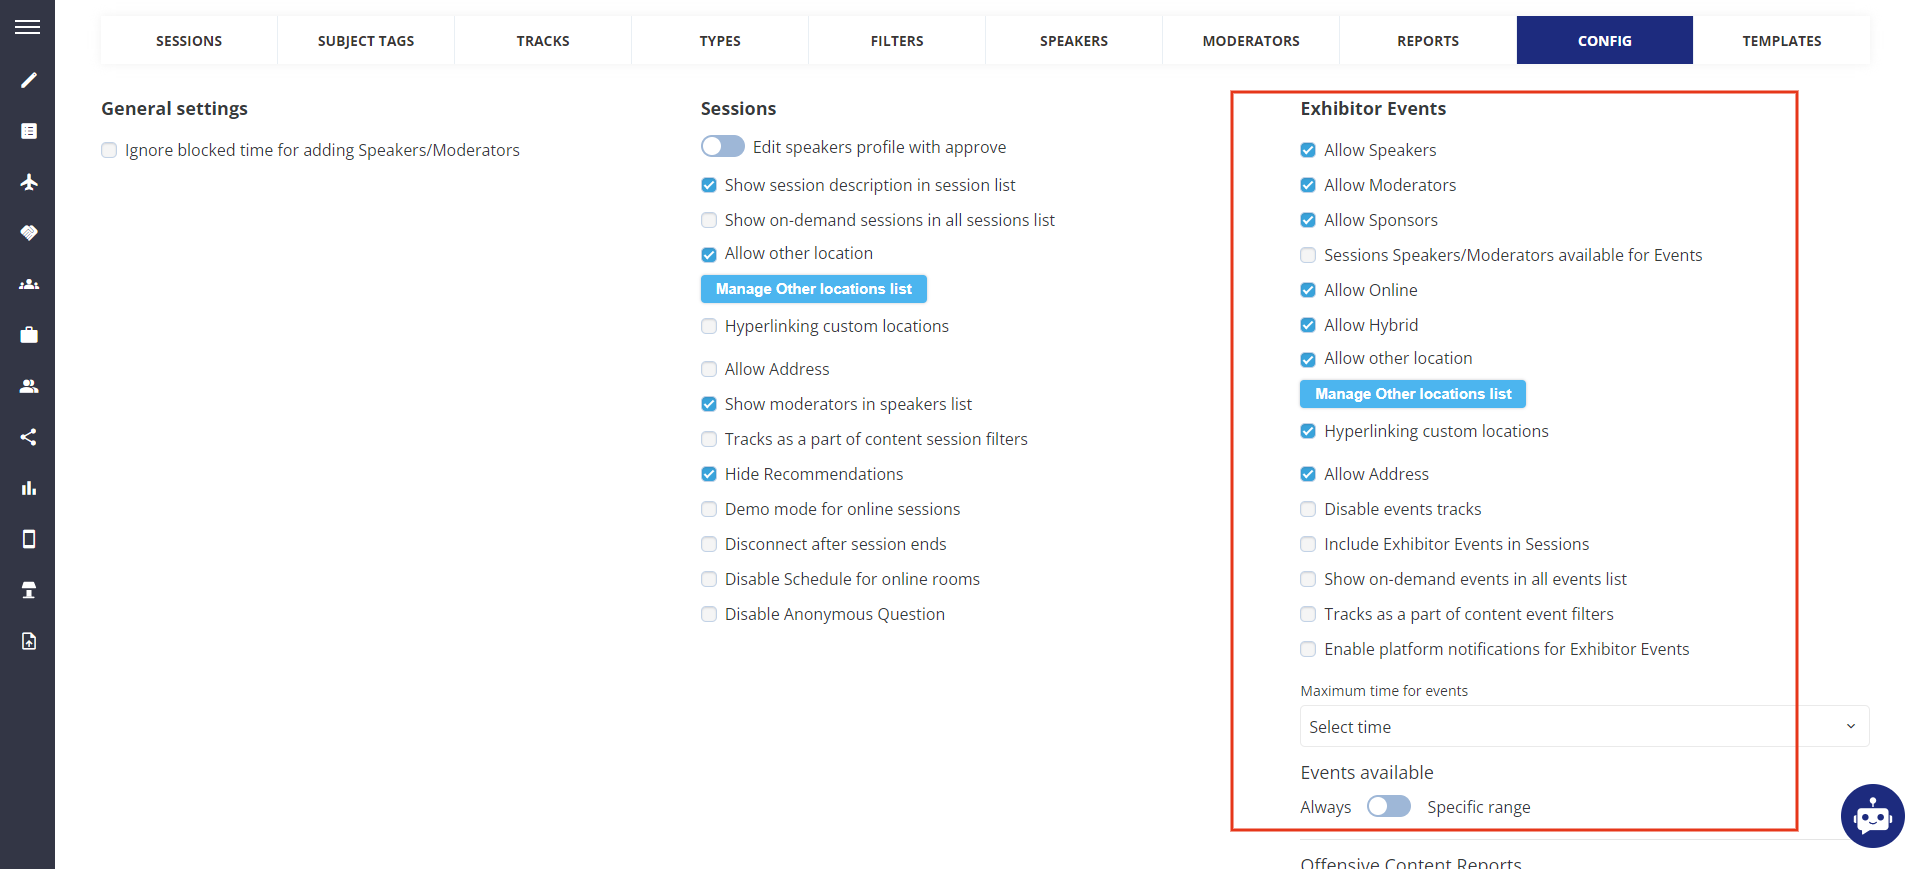
Exhibitor Event Config
Allow Other Location: This setting allows organizers to create a predefined list of other locations, which can be used as a location for both sessions and exhibitor events, akin to the functionality available for meetings (Other Location).
In the Sessions and Events creation or editing page, a selector is integrated to pick options from the predefined list for Other locations. This selector will be accessible when 'Other location' for session/exhibitor events is enabled.
On the front end, in the Exhibitor Event creation/editing page, the Exhibitor can choose from the predefined list of Other locations if this setting is enabled by the Organizer
Allow Address: This setting is a combination of selecting from a predefined list or typing a custom location/address for a Session/Exhibitor event on the session edit page.
The "Session location" section is categorized into two groups: "Floor plan locations," "Predefined Custom locations," and "Specify an alternative location."
When the organizer chooses "Specify an alternative location," two input fields appear: one for specifying the alternative location and another for the specific address.
Hyperlink Custom Location: This setting allows adding a hyperlink to custom locations so that clicking the location opens a specified URL, such as Google Maps or a website. This toggle will only appear if the Allow Other location option is checked.
On the frontend, during event creation, the URL input field for "Hyperlinking custom locations" will be displayed when a custom location is selected.
Show on-demand sessions in all sessions list: can be turned on to display ‘on demand’ sessions on the different tab from All sessions.
Track as a part of Content Session Filters: can be turned on to show tracks as part of content session filters and disappear from the top of the screen
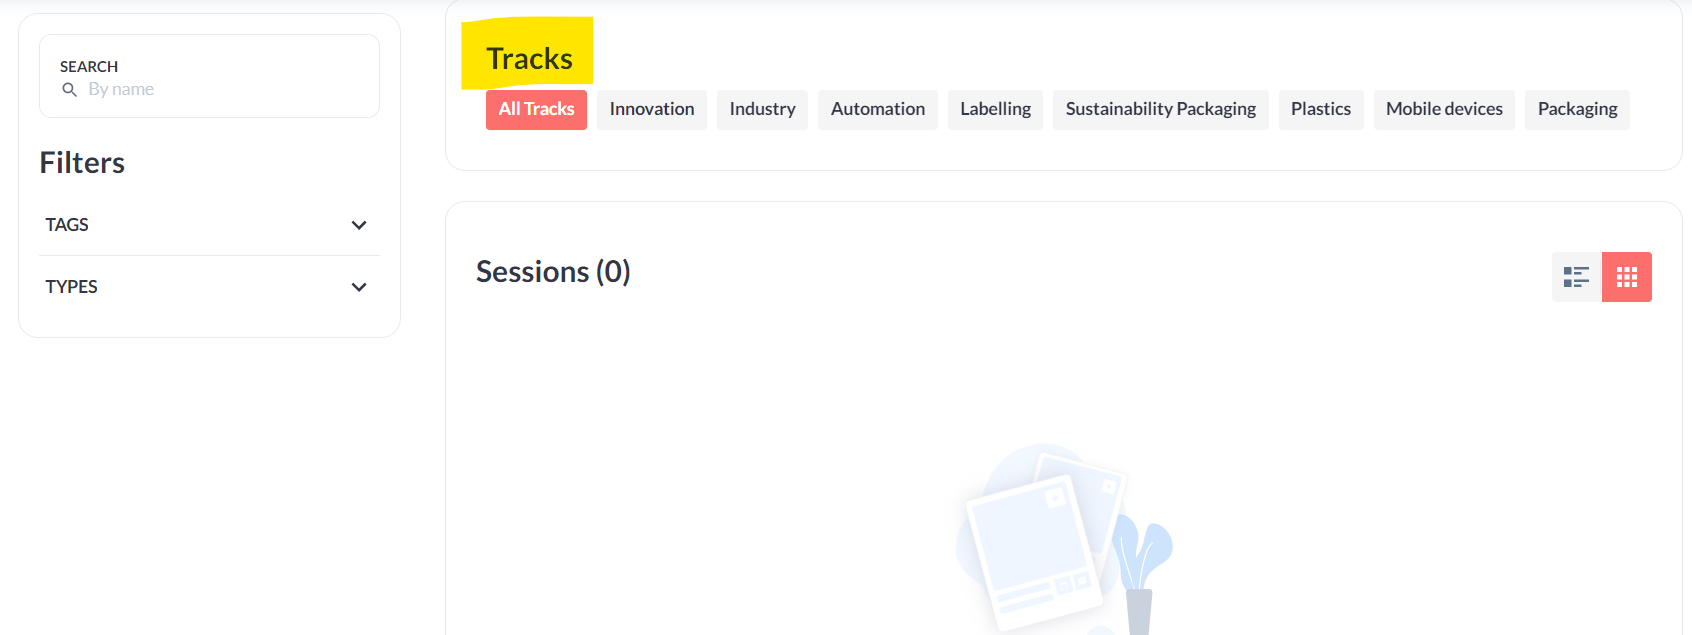
Track as a part of Content Session Filters: Off
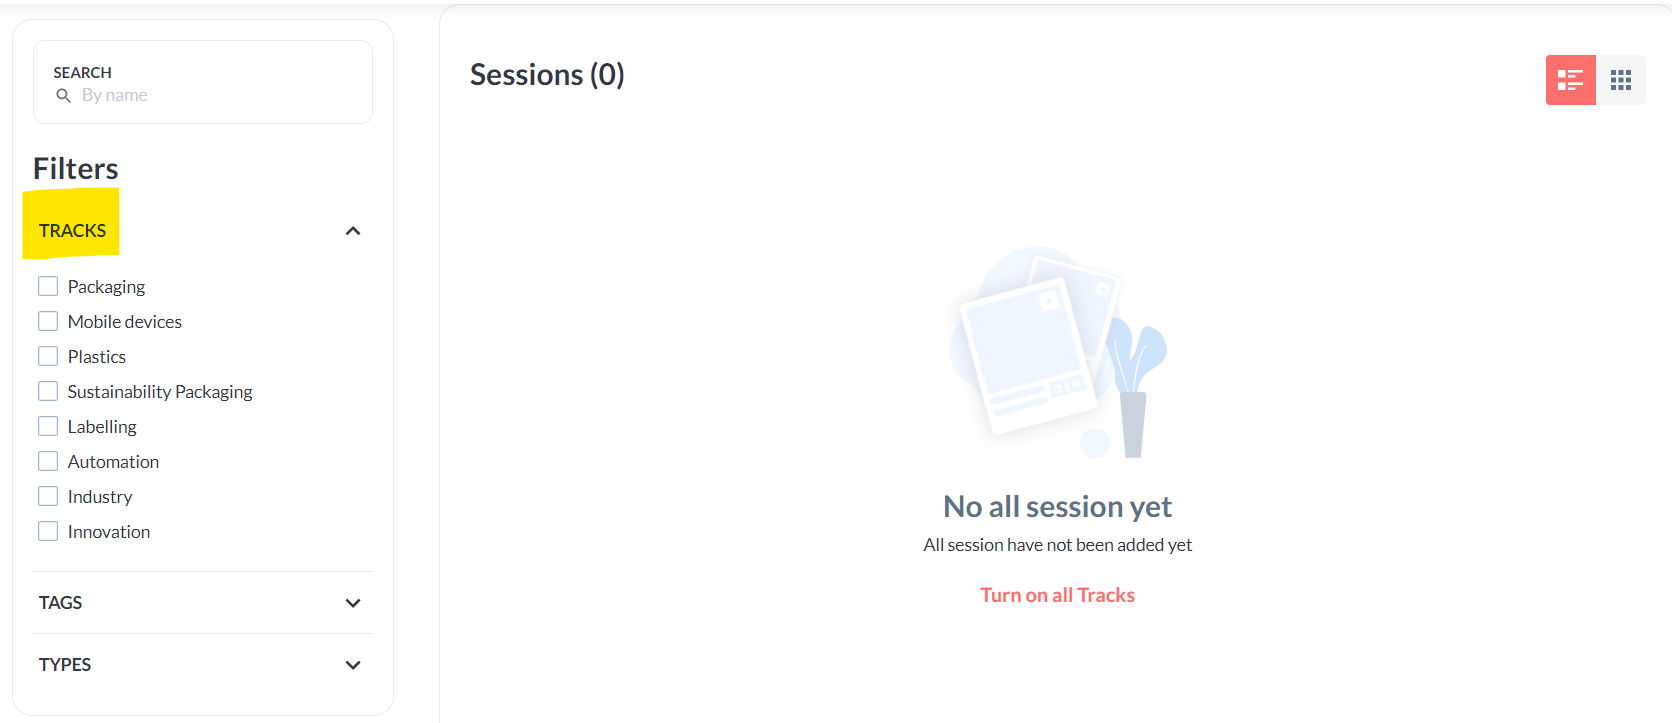
Track as a part of Content Session Filters: On
Adding Exhibitor Event
Include Exhibitor Events in Sessions: This setting enables the organiser to make Exhibitor Events part of the main session list on the session page on the frontend. Organisers also have the option to enable an additional filter for the Session page that helps in filtering out the session and exhibitor events.
The new filter has been added under the Admin Panel → Event Setup → Display Filter → Session → Session Format
In case of rescheduling an Exhibitor Event/Session: If a speaker or moderator has already been added to an event and the event time is subsequently changed, causing an overlap with a blocked time, a warning message will show up on saving the event/session.
If the exhibitor ignores the message and saves the Event, the Speaker/Moderator will be automatically removed from the event.
Additionally, the same logic applies while importing Sessions and Exhibitor Events via an XLS file or API. In such cases, users who have conflicting blocked time will not be added as speakers or moderators.
Adding Exhibitor Event in Multi-Language
Introduced Multi-Language functionality in Exhibitor Events to cater diversified linguistic preferences of an international audience.
Exhibitor Admin can draft the content of the exhibitor event in the languages supported by the platform for that very event.
How to create an exhibitor event in multi-language
After successful logination as an exhibitor, navigate to Profile Info → Exhibitor Events
Select the language from the list of supported languages on the Exhibitor Events platform.
Fill in all the details on the exhibitor event page and Click Save
Creating exhibitor events in multi-language
System-generated email notifications, including confirmations, updates, and reminders, is sent to users in their selected language.