Exhibitor Account: Header & Footer
This article describes the Header and Footer details on the exhibitor edit page
The header consists of the following sections
Header
Exhibitor Logo: This can be edited from the Registration Info Tab, If no logo is uploaded then it shows the first letter of the exhibitor name as the placeholder image. Placeholder colours are predefined in the design and are randomly assigned to each exhibitor. The header backround color is derived from the colour of the logo placeholder
Exhibitor name: Can be edited from the Registration Info Tab
Exhibitor city and country: Shows the country and city details from where the exhibitor belongs and these details can be edited from the Registration Info Tab
Navigation menu with items: Analytics, Registration info, Security, Exhibitor settings, Sponsorship, Team members, Floor plan. If these settings are disabled for the exhibitor at the Exhibitor or category level, these tabs under the navigation menu are still visible but with no details. But if these settings are turned off from Global or Local Management then these tabs will not be visible on the navigation menu
Back to exhibitor list button: Redirects the organiser to the exhibitor list page
Customer service“ button: Redirects the organiser to the frontend profile of the exhibitor
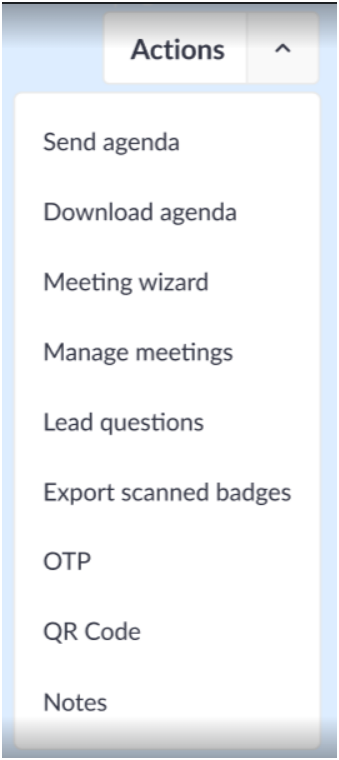
Action dropdown menu: It consists of various actions which the organiser can perform for that very exhibitor. It consist of below functions

Action Tab
a. Send Agenda: It sends the agenda to the exhibitor's email. After the file is generated and sent, a success message “The agenda was successfully sent“appears at the top of the screen.
b. Download Agenda: It downloads the agenda to the user’s current device. After the file is generated and downloaded, a success message “The agenda was successfully downloaded“ appears at the top screen
c. Meeting Wizard: The organiser is redirected to the meeting wizard page.
d. Manager Meetings: The organiser is redirected to the Manage Meetings page, from where the organiser can view all the meetings scheduled for that exhibitor
e. Lead Questions: The organiser is redirected to the Custom Lead question page from where he can manage and add custom lead questions for that exhibitor
f. Export Scan Badges: It downloads the scanned badge file to the user’s current device. After the file is generated and downloaded, a success message “The scanned badges were successfully exported“ appears at the top screen
g. OTP: After the button is pressed, a one-time password is generated and displayed in a message at the top of the screen.
h. QR Code: When the user clicks on the "QR code" menu item, a "QR Code" pop-up should appear. This pop-up includes:
i) A header with the pop-up name "QR code" and a "Close" button.
ii) The QR code of the current exhibitor, placed in the "SCAN ME" block.
iii) A text line saying, "Open your phone’s camera and point it at the QR code.
iv) A "Download QR Code" button.
Downloading QR Code
i. Notes: When the user clicks on the "Notes" menu item, a "Notes" pop-up should appear. The "Notes" pop-up includes:
i) A header with the "Notes" heading and a "Close" button.
ii) Each note consists of the admin’s (author's) name and photo, publication date, and a three-dots menu with options to delete and edit the note.
Adding Notes
Footer:
The footer of the page consists of Save and Cancel buttons. If the organiser leaves the page without saving the changes made the system pops up a warning message that the changes are not saved.
The warning mechanism treats every tab of the profile edit page as a separate page, preventing the user from switching between profile edit tabs without saving changes.
