Badge Scanning & Lead Retrieval (Exhibitors and their Team Members)
Scanning badges onsite is just one of the ways that exhibitors can get leads. The list below shows all of the lead sources and this guide outlines how exhibitors or TMs can get the most out of lead retrieval.
Leads sources:
Our dashboard showing who is interacting with your company profile, products and team members
Our event app includes the ability to scan badges, categorize leads, rate leads and make notes, including offline scanning of badges
Ability for visitors to request on-site meetings and send messages
Ability for visitors to scan badges and scan company and product QR codes
Ability for visitors to favourite companies and products
Lead retrieval features:
Ability to download leads
Ability to equip all of your stand personnel with lead retrieval
Steps for a team member or Exhibitor to scan a badge
Step 1: Download the event mobile app and log in using your exhibitor( company) or team member credentials.
Step 2: To scan a badge, choose Scanned Badges/QR Codes from the menu and tap on the scan badge icon on the bottom right.
This will open your camera so you can scan the badge. When the camera is pointed at the badge, it will automatically scan
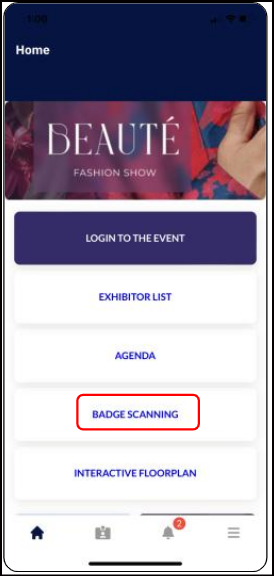
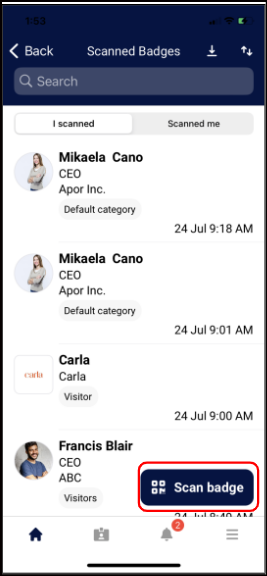
Depending on your permission settings you may be asked to give the app permission to use the camera or may need to tap within the scan window to grant permission
Once the badge has been scanned that person’s name and basic contact information will be automatically saved and they will appear on the Scanned Badges list.
This data is also automatically saved to the EP database at the same time, eliminating the possibility of any lost leads should the exhibitor forget to click the Save button.
App also has Scanned me list that show the details of all the users who have scanned my badge.
Both I Scanned and Scanned Me screens are accessible through the “Scanned Badges/QR Codes” button.
The name of this button may vary from app to app depending on the Organizer’s preference.
Step 3: The team member has the ability to take notes and add details for the user whose badge is scanned. Below are the details that can be added by a Team Member while scanning the badge
What type of lead they are (Potential Partner, Potential Client, Supplier, Other)
What type of client they are (New/Old)
If they’ve been contacted (Yes/No)
Lead Rating (1-5 stars)
Any notes about the lead
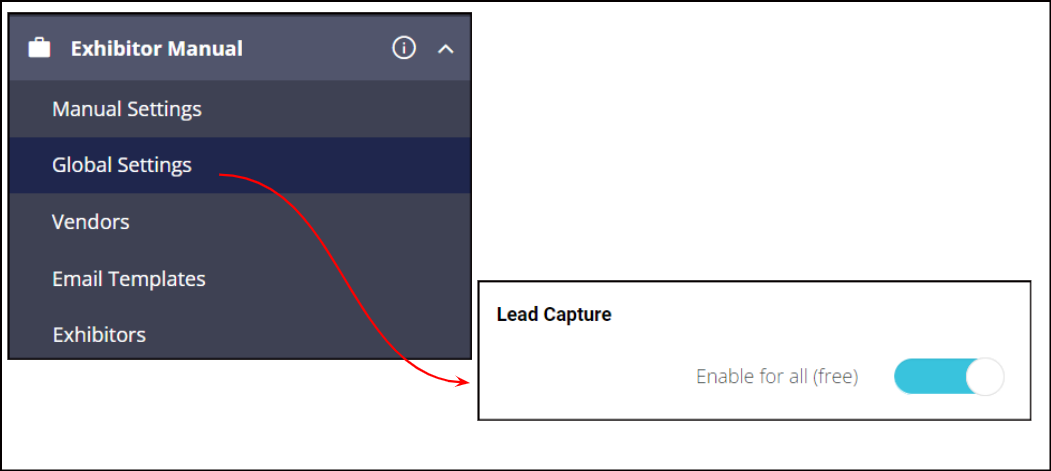
The notes on the leads can be only added if Lead Capture is enabled for all, it can be enabled from Exhibitor Manual>>Global Settings>>Lead Capture
You may also be able to see the lead's badge category, interest categories, purchasing power, and other details, depending on how the organiser has configured visitor registration and the event app.
Additionally Team Member can favourite the user profile, request a meeting, or send a message.
It’s also possible to scan a badge outside of the event mobile app, for example with a phone camera or QR code scanning app. If:
Badge is scanned and user has our app installed, the app is opened, user is asked to login (if unlogged), app opens Scan Badges page and regular flow of badge scanning proceeds
Badge is scanned and user has not installed our app, the event is opened in mobile browser, user is asked to login (if unlogged) and then redirected to the public page of scanned user
Badge is scanned and badge has an external QR code and user has not installed our app, then nothing happens.
This article explains in more detail
In addition to viewing scanned badges within the app, exhibitors can also export their leads as follows:
Method 1:
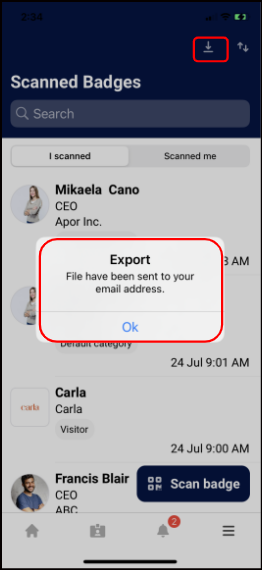
In the mobile app, on the Scan Badges page, there is an export link at the top of the screen. When clicked, this will trigger an email to that team member/exhibitor with an attached spreadsheet of leads that includes (depending on organizer configuration):
Name
Email
Company
Position
Address
Phone
Star Rating
Notes added
Products the lead was interested in
Type of client (new/old)
Time of scan
The email will also contain a file for Scanned Me that includes similar data (depending on the organizer configuration).
Method 2:
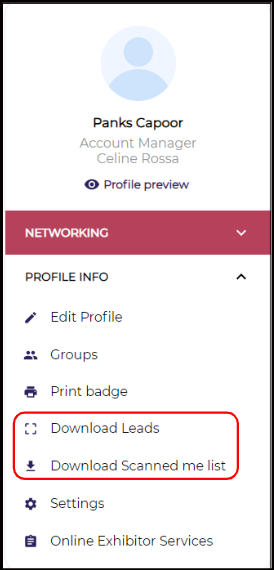
On the web, under Profile Info, there is a Download Leads and Download Scanned Me button. Clicking on either button triggers an immediate download to the user’s computer.
With both methods, it’s important to note:
When accessed using the exhibitor profile this download will include all web and all scanned leads for all team members. The downloaded spreadsheet will have an additional column for Lead Owner(Team Member who has scanned the lead)
When accessed using a personal profile this download will include all web and all scanned leads for just that person.
When the user scans the random QR code from the internet, the app shows- “not found” in the scan list page.
Important notes for Organizers:
Organizers can also download exhibitor scanning data in the Data Import/Export section through Exhibitors Scanned Contacts report
Which exhibitors are able to scan badges can be controlled through the mobile app builder
Scanning works both online and offline. When scanning offline, data is saved locally until a connection is established
Under Event Set Up > Networking & Matchmaking > Contact Sharing, Organizers can set which actions should count as a lead and whether the lead’s private information, such as email, should be hidden for any actions
